

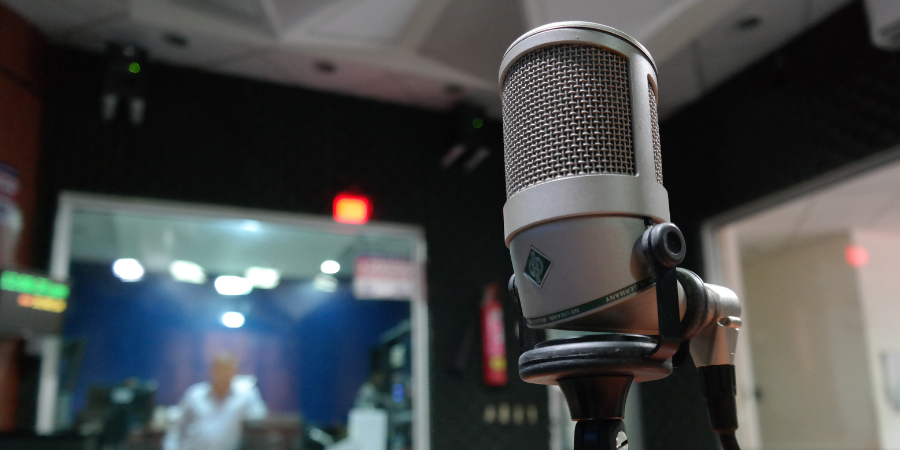
Microphones for IRL Streaming
Microphones for Outdoor & Mobile IRL Streaming: A Comprehensive Guide
Everything you need to know about microphones for IRL streaming. In real-life (IRL) outdoor streaming, audio quality is just as critical as video. Viewers will quickly turn away if wind noise or muffled voices dominate your stream. Choosing the right microphone can make a huge difference. This guide breaks down the types of microphones suitable for outdoor and mobile streaming – lavalier, shotgun, handheld, and wireless – explaining their pros and cons and what to consider when using them with smartphones or cameras. We’ll distinguish between beginner-friendly setups and professional solutions, and also cover essential accessories like windshields, recorders, adapters, and audio interfaces that can improve your outdoor audio. Finally, we’ll highlight four top microphone recommendations for outdoor streaming in 2024 (two geared toward beginners and two for professionals), complete with technical specs.
Table of Contents
Lavalier Microphones (Lapel Mics)
What they are: Lavalier microphones are small clip-on mics that attach to a person’s clothing (typically near the collar). They capture audio close to the speaker’s mouth, which helps produce clear, consistent sound even as the person moves. Lavalier mics are popular for IRL streaming because they keep the user hands-free and are minimally intrusive on camera. They can be used wired (plugged directly into a camera or recorder) or as part of a wireless system (with a bodypack transmitter).
How they work: Most lavaliers are electret condenser mics with an omnidirectional pickup pattern (meaning they pick up sound from all directions). The omni pattern is useful since the mic might rotate or move slightly with clothing; it will still capture the speaker’s voice evenly. Some lav mics are powered by the device (using plug-in power from a camera or a smartphone’s TRRS jack), while others have an in-line battery or draw power from a wireless transmitter. When using a lavalier with a smartphone, you often need a TRRS adapter (for phones with headphone jacks) or a USB/Lightning interface if the phone lacks an audio jack.
Pros of Lavalier Mics:
- Small and discreet – easy to hide on clothing, so they keep the focus on the streamer or scene rather than on the microphone.
- Hands-free operation, allowing the streamer to move naturally (ideal for walking streams, travel vlogs, or any scenario where you need both hands free).
- Consistent audio pickup even if the speaker turns their head or moves (the mic moves with them). In noisy outdoor settings, a lav mic placed near the mouth helps the voice remain clear over background sounds.
- Great for multi-person streams or interviews – you can mic each person with their own lav for balanced sound levels.
Cons of Lavalier Mics:
- Clothing noise: The mic can pick up rustling sounds if it rubs against clothing, hair, or accessories. Proper placement and using small rubber mounts or clips can help, but it’s a common issue.
- Ambient noise: Being omnidirectional, lavaliers may capture background noise (traffic, crowds, wind) along with the speaker’s voice. High-end lavs handle this better, and using a windshield (the little foam cover or furry “dead cat” sleeve) is essential outdoors.
- Wired limitations: A wired lavalier cable can restrict movement and pose a tripping hazard. You need to stay within the cable’s length of the camera/phone.
- Wireless considerations: Wireless lav systems solve cable limitations but introduce concerns about battery life and signal interference/dropouts. They are also pricier and require pairing and monitoring.
Buying tips for lavaliers: If you plan to use a lavalier with a smartphone, look for models marketed as “mobile” or “for smartphone” which often include a TRRS connector or an adapter. Some lavaliers come with a dual-purpose 3.5 mm jack that you can switch between camera (TRS) and phone (TRRS) modes. For camera use, ensure the mic either uses the camera’s plug-in power or has its own battery box, otherwise it may not function. Lavalier mics vary widely in price – beginner options can cost under $30, while professional broadcast lavaliers (from brands like Sennheiser, Shure, DPA) can cost hundreds. Match the lav to your budget and consider the environment: a durable cable and good wind protection are important for outdoor use.
Shotgun Microphones (Directional Mics)
What they are: Shotgun microphones are highly directional mics designed to focus on sound coming from directly in front of them while rejecting sound from the sides and rear. They get their name from their long, slotted interference tube design, which gives them a “shotgun” barrel shape. For outdoor streaming, shotgun mics are often mounted on top of a camera or on a small boom pole or grip, pointing at the sound source (for example, at the streamer’s mouth).
How they work: Shotgun mics typically have a supercardioid or hypercardioid polar pattern (with an even narrower focus sometimes called a “lobar” pattern). This makes them excellent at picking up a subject’s voice at a distance and in noisy environments, because they reject a lot of off-axis background noise. They are usually condenser microphones that require power – either via a camera’s phantom power / plug-in power or through an internal battery. Many on-camera shotgun mics (like those meant for DSLRs or smartphones) can run off the small voltage supplied by the 3.5 mm mic jack or have rechargeable batteries.
Pros of Shotgun Mics:
- Directional focus: They capture clear audio of the subject while minimizing ambient noise. This is great for busy outdoor areas – e.g., if streaming in a market or city street, a shotgun pointed at you will pick up more of your voice and less of the surrounding chatter compared to a built-in phone mic or an omni mic.
- Flexible placement: You don’t have to wire up the talent. A shotgun can be mounted on the camera or held just out of frame on a boom pole or tripod. This makes it useful if you want to record someone without clipping a mic on them (for instance, filming street performances or multiple people spontaneously).
- Better sound at a distance: A quality shotgun mic can still get usable dialogue from a subject a few feet away, which is useful if you cannot be right next to the camera. It also captures more natural environmental sound from the front, which can give your stream a sense of place without overwhelming the speech.
- Easy to use: For a single-person stream, mounting a small shotgun mic on your camera or phone rig is straightforward – just plug it in and point it toward you. There’s no transmitter/receiver to manage and no mic on your body.
Cons of Shotgun Mics:
- Mic orientation is critical: You must aim the mic toward the sound source. If you turn your head away or the camera isn’t pointed correctly, your voice may drop in volume. This directional nature means you need to be conscious of staying “on-mic”.
- Handling noise: When mounted on a camera that you’re carrying or on a handheld rig, movements can introduce handling noise (thumps or bumps). Using a shock mount (most come with one) is necessary to isolate the mic from vibrations, and you still need a steady hand.
- Wind noise: Shotguns are very sensitive to wind – even a light breeze can cause a loud rumble in the audio. A basic foam windscreen helps only a little; for outdoor use, a dead cat (fur windshield) is highly recommended to cut wind noise. This adds bulk but is crucial in outdoor settings.
- Range and echo: While they do well focusing on close/medium-range sound, shotguns used in wide open or highly reflective spaces can still pick up distant noises or echo. For example, outdoors you might get echoes off buildings or noise from all around if it’s loud enough, just slightly attenuated. In very noisy environments (like a concert or busy street), a shotgun alone might not fully isolate your voice if you’re not very close to it.
- Power requirement: Some high-end shotgun mics use XLR connectors and need 48V phantom power (common in professional cameras or recorders but not available on consumer cameras/phones). Others run on batteries or are designed for 3.5mm inputs. Always check compatibility with your device – you might need an XLR adapter or a mic that has its own power solution for use with a smartphone or small camera.
Using shotguns with smartphone vs camera: For smartphones, you’ll typically use compact on-camera style shotgun mics that have a 3.5 mm TRS output (which you convert to TRRS for phone) or newer models that can directly connect via USB-C or Lightning. These mini shotgun mics (from Rode, Deity, Sennheiser, etc.) are great for mobile rigs. If using a professional XLR shotgun like the Sennheiser MKE 600 or Rode NTG series with a phone, you’ll need an audio interface or adapter (see Accessories section) to provide power and convert the connection. For cameras, many shotguns are made to mount in the hot shoe and plug into the mic jack – truly plug-and-play. Just be mindful of keeping spare batteries if your mic requires one, and always use the appropriate windshield outdoors.
Handheld Microphones (Interview Mics)
What they are: Handheld microphones are the classic style of mic that you hold in your hand – commonly seen with reporters, interviewers, or presenters on the street. They are often dynamic microphones, meaning they don’t require external power and can handle loud sounds well. In outdoor streaming, handheld mics are useful if you plan to interview people, do commentary like a reporter, or simply prefer holding a mic (some streamers like the on-camera look of a microphone). They can be wired (with an XLR or 3.5 mm cable) or wireless (either a self-contained wireless mic/transmitter or connected to a wireless pack).
How they work: A typical interview mic (like the popular Shure SM58, Sennheiser MD46, or Electro-Voice RE50 series) is dynamic and often cardioid or omnidirectional. An omnidirectional dynamic handheld is common for interviews because it picks up sound from all around the mic head, making it easier to capture voices of both the interviewer and guest without perfect aiming. A cardioid dynamic will focus more on whoever it’s pointed at and reject some background noise, but requires a bit more careful handling (point it toward whoever is speaking). Handheld mics have built-in wind filters (foam inside the grille) and can be outfitted with an external foam ball or furry cover for extra wind protection.
Pros of Handheld Mics:
- Rugged and reliable: Dynamic handheld microphones are built to withstand rough use – they tolerate drops, knocks, and harsh weather better than delicate condenser mics. They also generally handle loud sound sources without distortion.
- Excellent speech clarity: When held close to the mouth, a good handheld mic provides a full, clear sound with reduced background noise. It’s great for noisy outdoor settings because the mic is literally right at the speaker’s lips, boosting the voice over ambient sound.
- Control and flexibility in interviews: You can easily pass a handheld mic back and forth between people or aim it at whoever is speaking. This can yield better audio for multiple speakers without each having their own mic. It also signals to bystanders that you’re doing an interview (which can be helpful in getting people’s attention politely).
- No batteries needed (for dynamic types): Most handhelds are dynamic mics, so if you use them wired, you don’t need phantom power or internal batteries – just plug into a recorder or a wireless transmitter. This simplifies the setup as you won’t have an extra power source to monitor (unless using a wireless system).
- Reduced handling noise: Quality interview mics are designed to minimize handling noise (e.g., the Electro-Voice RE50 is famous for an internal shock mount that dampens handling thumps). This is important since you’ll be moving the mic around in your hand.
Cons of Handheld Mics:
- Not hands-free: The obvious downside is you need to hold the microphone. This can be inconvenient if you’re also operating the camera or engaging in an activity. Your one hand will always be busy holding the mic, which might not suit all streaming styles.
- On-camera presence: A handheld mic is visible on camera by design. If you prefer a clean look or don’t want to appear as a “reporter,” a big mic in frame might be undesirable. Lavalier or shotgun mics would be more discreet in that case.
- Technique needed: While easier to manage in interviews, using a handheld effectively still requires some technique. If you hold it too far from your mouth, your voice will sound distant; too close and you might get “pops” from plosives (though using a foam cover helps). If it’s a cardioid pattern, you need to point it toward each speaker as they talk. New users might take time to get comfortable with this.
- Cable or transmitter required: A wired handheld mic with an XLR cable can be limiting for mobile use – it tethers you to the camera/recorder and the cable could snag or tangle (especially if you’re moving around while streaming). Most IRL streamers opt to use a handheld mic wirelessly (by plugging it into a wireless transmitter pack or using a dedicated wireless handheld mic). Wireless solves the mobility issue but adds weight to the mic and requires battery management in the transmitter.
- Connection to smartphones: If you want to use a professional handheld mic with a smartphone, it’s not straightforward. You’ll likely need an XLR-to-mobile adapter or interface since phones don’t have XLR inputs. There are small battery-powered preamp adapters that take an XLR mic and output to a 3.5mm or USB for phones. This extra gear can be cumbersome, but it’s necessary to get the best out of a dynamic mic on a phone.
When to use handhelds: Choose a handheld mic if your streaming content involves talking to people on the street, doing live commentary at events, or if you simply want that broadcast-style audio. They’re also a good backup – for example, if your wireless lav fails or if it’s too windy for a lav, a handheld dynamic mic with a windscreen might cut through the noise better when held close. Just remember you’ll sacrifice some convenience of movement. For many solo IRL streamers, lavalier or shotgun mics are more practical day-to-day, but it’s great to have a handheld in your kit for specific scenarios.
Wireless Microphone Systems
What they are: Wireless microphone systems refer to any setup that transmits audio from a mic to your camera/phone without a cable. In practice, this usually means a transmitter (attached to or built into the microphone) sends the audio via radio frequencies to a receiver connected to your recording device. For outdoor streaming and mobile use, wireless systems grant you freedom of movement – you can walk and roam without being tethered by a wire, which is invaluable for IRL streamers.
Types of wireless systems: There are a few common forms:
- Wireless lavalier systems: These have a bodypack transmitter that you plug a lav mic into (clipped on you), and a receiver that mounts on your camera or connects to your phone. Example: a Sennheiser EW series, or Rode Wireless GO (where the transmitter itself can act as the mic or accept a lav).
- Wireless handheld mics: These are handheld interview mics that have a built-in transmitter or a plug-on transmitter on a standard mic. The receiver, again, attaches to your recording device. This is common in professional news gathering.
- Digital clip-on wireless: In recent years, ultra-compact digital wireless kits (often on 2.4 GHz frequency) are popular for creators. These include small clip-on transmitters with built-in microphones. You can use them directly by clipping the little box to your shirt, or plug an external lavalier into them. The receiver is also small and usually fits on a camera or even a smartphone gimbal. Examples include the Rode Wireless GO II, DJI Mic, Hollyland Lark series, etc.
Pros of Wireless Systems:
- Total mobility: You can move freely at a distance from your camera/phone. This is essential for many outdoor streams – for example, if you’re live streaming a walk through a park or doing a cooking stream at a campsite, you’re not constrained by a cable. You can also place the camera further away for a wider shot while still capturing clear audio of the subject.
- Flexibility in mic choice: Wireless systems can carry audio from different types of mics. You might use a tiny lavalier for discretion, or swap in a handheld mic for an interview, using the same transmitter pack (if it has the appropriate input or if you have a plug-on transmitter). It’s a modular approach – the transmitter is the link, and you can attach the mic that suits the situation.
- Professional features on the go: Higher-end wireless kits offer features like multiple channels (for two mics), encryption (to avoid interference or eavesdropping), long transmission range (hundreds of meters line-of-sight), and even onboard recording (some new systems let the transmitter secretly record the audio internally as a backup in case the wireless signal drops out). These features give a level of reliability crucial for professional live streams and shoots.
- Less clutter on camera rig: Without a long mic cable to manage, your camera or smartphone rig can be cleaner and easier to handle. Just one short patch cable from the receiver into the camera/phone, and you’re set. This reduces the risk of snagging cables or getting tangled while moving around.
Cons of Wireless Systems:
- Battery dependency: Both transmitter and receiver run on batteries (internal rechargeables or AAs, depending on the system). You have to monitor battery levels and recharge or swap batteries during long streams. If either unit dies, you lose audio. Keeping spares or external USB power banks handy for charging is a must for long sessions.
- Potential signal interference: Wireless signals can be subject to interference or dropouts, especially in busy RF environments (imagine a convention center or a downtown with lots of Wi-Fi/Bluetooth signals). Modern digital systems are pretty robust, but you might still encounter brief audio dropouts if the signal is blocked (walking behind a thick wall, for instance) or if there’s heavy wireless traffic. Traditional UHF systems can face interference if other devices are on the same frequency. It’s important to test beforehand and, if possible, use systems with automatic frequency hopping or selection to find clear channels.
- Setup and troubleshooting: There’s a bit more setup involved – pairing transmitters to receivers, setting gain levels on the system, and ensuring you correctly connect the receiver to your recording device. If something goes wrong (no sound, noise, etc.), troubleshooting a wireless system is trickier than a wired mic. You need to check for things like mute switches, RF pairing, etc. Beginners might find this overwhelming at first.
- Cost: Quality wireless microphone systems are more expensive than their wired counterparts. While there are budget options available, a reliable system from a reputable brand can be a significant investment. For example, a wired lav mic might be $30, whereas a decent wireless lav kit might start around $150 and go up to $500+ for pro units. You pay for the convenience and technology.
- Output connection to device: Many wireless receivers output a standard 3.5 mm TRS audio signal (or XLR on pro units). To use this with a smartphone, you’ll likely need a TRS-to-TRRS adapter or a specialized cable (because smartphones expect a headset-style TRRS mic input). Some newer wireless receivers have USB outputs or even dedicated phone connectors (like Lightning adapters for iPhone) which simplify this, but not all. It’s another compatibility consideration: ensure your receiver can connect to your streaming device (camera or phone) easily.
Choosing a wireless system (Beginner vs Pro): If you’re just starting, you might opt for the newer 2.4 GHz digital wireless kits (like Rode Wireless GO II, DJI Mic, or similar). These are user-friendly – they pair automatically, handle frequency hopping in the background, and often are very compact. They work globally without licensing (unlike some UHF systems that require frequency licenses in certain bands). Professionals, on the other hand, might choose UHF or advanced digital systems (like Sennheiser’s EW series or Shure’s systems) for greater reliability in challenging conditions and the ability to replace components (different mics, high-end lavalier capsules, higher RF power, etc.). Those systems can often integrate with professional cameras via XLR receivers and generally have a longer proven track record for live use. That said, the gap is closing – even many professionals now happily use compact systems like the DJI or Rode in the field due to their convenience, supplementing them with backup recordings.
Factors to Consider When Buying a Microphone for Smartphone or Camera Streaming
Choosing the right mic involves looking at both the technical compatibility with your device and the practical requirements of outdoor streaming. Here are key factors to consider:
- Connector and Compatibility: Ensure the microphone can connect to your streaming setup. Smartphones typically need a TRRS 3.5mm plug (the kind with four segments on the jack) if using the analog headphone jack input, or a USB/Lightning connection for newer phones without jacks. Many camera microphones have a 3.5mm TRS output (three segments on the jack) meant for DSLRs and mirrorless cameras. To use those with a phone, you’ll need a small adapter cable that converts TRS to TRRS. For iPhones, you’ll also need the Lightning-to-3.5mm dongle. Alternatively, choose mics that offer direct smartphone connectivity (some wireless kits come with Lightning/USB-C receivers, and some shotguns can plug in via USB-C). If you’re using an action camera or gimbal, check if they have mic adapter accessories available. Always verify that your camera or phone model supports external microphones and note what kind of connector it requires.
- Power Requirements: Different mics have different power needs. Condenser mics (lavalier or shotgun) may require bias power (also called plug-in power, typically ~3-5V provided by the camera/phone) or full 48V phantom power (for professional XLR mics). Dynamic mics don’t need external power but provide lower output levels. If your camera’s mic input doesn’t supply power (most cameras do supply plug-in power on the 3.5mm jack; smartphones usually provide minimal bias voltage), you might need a self-powered microphone or an external preamp. For example, some lavaliers have a battery module to use with devices that don’t provide power. Similarly, a shotgun like the Sennheiser MKE 600 can run on an internal battery if your camera can’t give it phantom power. Bottom line: match the mic to what your device can support, or include the necessary power supply (battery box, phantom power adapter, etc.) in your setup.
- Mounting and Portability: Consider how you will carry or mount the mic during mobile streams. If you use a smartphone on a gimbal, weight and balance are critical – a heavy shotgun mic could throw off the gimbal’s balance. In such cases, a lightweight wireless receiver or a small lav mic might be preferable. If you have a camera rig, ensure it has a cold shoe or bracket to hold a microphone or receiver. There are phone cages and brackets that add mounting points for mics and lights – these can be very useful. Handheld mics might require you to also carry a small stand or have a system to stash it when not in use. Think about your streaming style: walking around => you need everything securely attached; static tripod => you can afford a larger mic or even a boom stand just out of frame. Also, outdoor use demands some durability – if a mic has flimsy plastic mounts, it might not survive long treks or rough handling.
- Audio Quality and Directionality: Different mics have different sound profiles. An omnidirectional lavalier will pick up a bit of the environment, giving a natural feel but possibly more noise, whereas a shotgun will be more focused but might sound less full if you’re moving around it. Frequency response matters too: some small mics might not capture deep bass (which could be fine for voice), and some have a treble boost for clarity. If possible, listen to samples or reviews of how the mic sounds for voice recording, especially outdoors. Also, consider if you need a stereo mic or mono. Most streaming is fine (even preferable) in mono for voice, but if you want ambient stereo sound (maybe for a nature stream capturing surrounding audio), there are stereo microphones or using two mics spaced apart. Generally, a single good mono mic is standard for voice in IRL streams.
- Wind and Noise Handling: Because you’ll be outdoors, pay attention to how the mic handles wind and what accessories are included or available. Built-in wind protection (like internal foam) is good, but you will usually need external wind protection (foam cover, blimp, or furry windshield). Many mics marketed for cameras come with a basic foam windscreen; some include a furry cover in the package. If not, budget to buy one separately – it’s a must for outdoor audio. Also, consider shock resistance: does the mic or its mount isolate from bumps? For instance, if you attach a shotgun mic to a camera, a shock mount is important to prevent handling noise when you move the camera. For lavaliers, little things like a rubber mount or clip can reduce noise from movements. If you expect very noisy conditions, you might lean towards dynamic handheld mics or very directional mics which naturally cut down noise.
- Number of microphones / channels: Are you streaming solo, or will you have a partner/guests regularly? If you need to capture two people’s voices clearly, you might consider a dual-channel wireless system (which comes with two transmitters and one receiver to handle two mics at once) or use two different mics (e.g., two lavs into an audio interface that can mix them). Some consumer devices only accept a stereo input which can be used as two separate mono channels for two mics – this gets complicated, so beginners often opt for a dual wireless kit that outputs a mixed signal. Plan ahead if multi-person streams are your goal – it might influence whether you get a certain wireless kit or an audio interface for multiple inputs.
- Budget and Upgradability: Beginners might start with an affordable mic, but if you foresee a lot of streaming, investing a bit more up front in a reliable microphone can save frustration. That said, you don’t have to break the bank to get decent sound. It’s about balancing cost with features. A $40 lavalier with a cheap adapter might serve you just fine for casual streams, whereas a professional full-featured wireless kit could run $400+. Also, consider upgradability: for example, if you buy a wireless system, can you use different microphones with it later (many bodypack transmitters accept any lavalier with the right connector, so you could upgrade the mic itself later)? Or if you buy a small audio recorder, it might double as a USB interface for better mics down the road. Think of your audio gear as an ecosystem – maybe you start simple, but plan for how you might expand or improve it as you become more professional.
Beginner vs. Professional Solutions
When it comes to outfitting your stream with audio gear, there is a broad spectrum from simple beginner setups to complex professional rigs. Understanding the differences will help you make an informed choice that fits your needs and experience level.
Beginner-Level Options
Simplicity and affordability: Beginner solutions prioritize ease of use. These mics are often plug-and-play, meaning you can connect them to your camera or phone and start streaming without extensive setup. Examples include a basic clip-on lavalier mic or a small on-camera shotgun. They are generally affordable – perfect if you’re just testing the waters of outdoor streaming or have a limited budget. Many beginner-friendly mics are in the $20–$100 range and offer good sound quality for the price, even if they don’t have the absolute best audio fidelity.
Consumer connectors: Entry-level gear is usually made for consumer devices. That means 3.5mm plugs, USB connectors, etc., which fit directly into cameras, smartphones, or laptops. You won’t typically need extra mixers or preamps; the mic will be designed to work with the device’s built-in audio input. For instance, a beginner lavalier might terminate in a TRRS jack that goes straight into a phone, or a beginner shotgun mic might have an integrated cable for a camera’s mic port.
Portable and lightweight: Beginners are likely using smartphones or compact cameras, maybe even a selfie stick or gimbal. Beginner mics tend to be light and small to accommodate this. A tiny wireless receiver or a mini shotgun mic won’t add much bulk. They’re also often made of plastic – durable enough for normal use, but perhaps not as rugged as pro gear. The upside is they won’t weigh you down during long streams on foot.
Limited feature set: Cheaper solutions usually have fewer bells and whistles. They might lack things like adjustable gain, advanced noise filtering, or modular components. For example, a basic wireless mic might have a fixed internal battery and no backup recording feature, whereas a pro one might offer those. Beginners typically won’t miss these at first; the focus is on capturing clear audio without fuss. You can often compensate for missing features with a bit of technique (e.g., manually moving a mic closer rather than boosting gain, etc.).
Examples: A beginner IRL streamer might use a simple wired lavalier mic clipped to their shirt and plugged into a phone (using an adapter). It’s a single-cable, straightforward solution. Another might use a compact shotgun like the Rode VideoMicro on a camera – it has no controls, it just works when you plug it in and points at your face. Or a starter might try an affordable wireless kit from brands like Boya or Hollyland for under $150, which usually have automatic pairing to keep things simple.
Bottom line for beginners: Keep it simple. You want to focus on your content, not managing complex audio gear. Choose a mic that reliably improves your audio over the built-in camera/phone mic, and learn the basics of how to position and use it. As you gain experience (and if you find audio limitations in your current gear), you’ll have a better sense of what to upgrade later.
Professional-Level Options
Higher audio quality and consistency: Professional solutions aim for top-notch sound in all conditions. These mics and systems capture a richer, clearer audio with lower noise, better dynamic range, and more consistency even when conditions are challenging (like very loud environments or big open outdoor spaces). Pros often use broadcast-grade lavaliers (which sound very natural and resist clothing noise), high-end shotgun mics that can pick up dialogue crisply from a distance, or high-fidelity dynamic mics for clean voice reproduction. The improvement in sound can be subtle to an untrained ear, but it’s critical for productions where audio quality cannot be compromised.
Advanced features and control: Pro gear comes with features that allow a skilled user to adapt to any situation. For example, professional wireless systems might let you manually select frequencies or output at higher RF power for better range, use encryption for interference prevention, and offer multiple audio output options (XLR, balanced outputs, etc.). A pro shotgun mic might have a low-cut filter switch to reduce rumble or a pad to handle loud sounds. There are also dedicated audio mixers/recorders used in pro setups that let you adjust levels, add limiters (to prevent clipping), or even multitrack several microphones. With these, a sound operator can fine-tune audio live. All this means pros have more control to get perfect audio, but it requires knowledge to use effectively.
Ruggedness and reliability: Professional streamers or videographers often operate in more demanding environments and for longer hours. Pro microphones and IRL accessories are built to endure that. They typically have metal construction, robust cables and connectors that won’t fail with repeated plug/unplug, and better resistance to weather. For instance, a pro wireless receiver might be all-metal with locking connectors (so cables don’t accidentally pull out), and a pro lavalier’s cable might be reinforced to resist sweat and tugging. This gear is also serviceable – you can replace cables, antennas, windscreens, etc., which is important if something wears out during heavy use.
Complex setup and support gear: With great power comes a more complex setup. A professional audio kit for outdoor streaming could include multiple pieces: field recorder, preamp interface, wireless systems with multiple receivers, timecode sync devices, etc. It can be overkill for a simple one-person stream, but for larger productions or very high-end solo streams, these tools ensure everything runs smoothly. However, it means there’s more that can go wrong if not set correctly. Professionals mitigate this by thorough testing and having a workflow – for example, monitoring audio with headphones at all times, having spare units on standby, or recording a backup audio track independently.
Cost and investment: Pro audio equipment is expensive. A single professional wireless mic set can cost as much as an entire beginner streaming setup. It’s an investment usually justified by the returns (if you’re a paid content creator, filmmaker, or you simply must have the best quality). The good news is that pro gear holds its value and often lasts many years. Upgrading from beginner to pro gear is something many do gradually: you might first get a better mic, then later add a field recorder, then better wireless, etc., as your needs grow. It’s seldom necessary to buy the most high-end option from day one unless you already know exactly why you need it.
Examples: A professional outdoor streaming rig might use a dual-channel UHF wireless system like a Sennheiser ENG set or Shure system, feeding into a portable field mixer/recorder (like a Zoom F4 or MixPre) which then outputs to the streaming encoder or camera. The streamer could be wearing top-tier DPA lavalier microphones hidden in clothing, ensuring crystal-clear speech. Alternatively, a pro might mount a broadcast shotgun mic (XLR) on a boom, connected via an XLR adapter to their camera or recorder, to capture dialogues or ambient sound with high fidelity. All of this yields fantastic sound, but it’s more involved than a plug-and-play mic.
Bottom line for professionals: Professional solutions offer superior audio and reliability, but they require a higher skill level to use properly and a bigger budget. If streaming is your career or part of a professional production, investing in pro audio gear can dramatically improve the viewer experience and reduce technical issues. Just be prepared for a learning curve in getting the most out of the gear.

Essential Accessories for Outdoor Audio Success
Even the best microphone can benefit from the right accessories – and in outdoor streaming, some accessories are absolutely crucial. Here are some useful add-ons to consider, and how they help enhance your audio setup:
- Wind Protection (Windshields): Wind is the enemy of clear outdoor audio. A windshield (also called a windscreen) is a cover that goes over your microphone to reduce wind noise. There are two main types: foam windscreens, which are the basic sponge covers usually provided with mics, and “dead cat” furry windscreens, which are the fluffy-looking covers designed for heavier wind. For light breezes, foam covers may suffice and also help with plosive sounds (hard “P” and “B” sounds). But for any significant outdoor use, a furry windshield is gold – it can cut down wind noise dramatically while only slightly affecting the sound quality. Make sure you get one that fits your mic snugly. Lavalier mics often have tiny foam covers and optional stick-on furs (little furry squares you can tape over the mic under clothing). Shotgun mics have custom fur covers (“softies” or blimps) you can buy. Always test your setup in windy conditions; sometimes multiple layers (foam + fur over it) yield the best results. Tip: Carry spares – these windshields can fall off or get wet. Having an extra can save your stream if one gets lost mid-session.
- Portable Audio Recorders: A portable recorder (like a Zoom H-series, Tascam DR-series, etc.) is a multi-purpose accessory for streamers. It acts as a dedicated audio capture device, which can be used in a few ways. One, you can record a backup of your audio separate from your stream – this is useful if you plan to edit and post-produce your stream later, or simply as a safety net if the stream audio has issues. Two, some recorders function as microphone preamps/interfaces: you plug your mic into the recorder, monitor or adjust levels there, and then output the sound into your camera or streaming phone. This can improve audio quality because these recorders often have better preamps than cameras, resulting in cleaner sound with less hiss. They also let you monitor with headphones even if your camera/phone doesn’t have a headphone jack. Additionally, recorders allow more complex setups: you could mix multiple mics (many have 2 or 4 inputs), use XLR mics easily (they provide phantom power), and control gain precisely. For example, a small recorder like the Tascam DR-10L can be worn on the body with a lav mic for a backup recording, or a Zoom H1n can be mounted on the camera to record and pass audio through. If you are serious about audio, a recorder is a worthy addition.
- Adapters and Cables: A collection of the right adapters is essential for connecting everything properly. Common adapters include: TRS to TRRS adapter (for using camera mics with phones – e.g., Rode SC4 cable), XLR to 3.5mm adapter (some come with built-in impedance matching or even a battery to provide plugin power, like a D-XLR adapter), USB audio adapter (if your phone or camera supports USB audio, a simple USB sound card or high-quality adapter might let you use headsets or other mics via USB). If you use an iPhone, Apple’s Lightning to 3.5mm adapter is a must-have (actually, have a couple as they can fail or get lost). For Android phones with USB-C and no jack, a USB-C to 3.5mm adapter (with DAC) is needed – not all are equal, so get one known to support external mics. If you plan to use two mics with one camera, a stereo splitter or 2-channel adapter can combine them (often one mic goes to left channel, one to right). Wireless receivers sometimes come with different output cables (TRS for cameras, TRRS for phones) – keep those handy. Also, cable length and management: if you use a wired mic, you might need extension cables. Use high-quality shielded cables to avoid interference. Lastly, simple items like Velcro straps or twist ties to manage cables on your rig can make a big difference in keeping things neat and preventing accidental tugs.
- Audio Interfaces and Mixers: If you are aiming for advanced setups or using professional mics, a dedicated audio interface or mixer could be very useful. An audio interface is essentially an external sound card that can take one or more microphone inputs (often XLR or 1/4″) and output a signal (usually via USB) to a computer or even a smartphone/tablet. There are now interfaces specifically designed for mobile streaming – some can attach to phones or have built-in battery power. For example, the iRig Pre series are small XLR adapters with phantom power for mobile devices, and devices like the Rode AI-Micro or Saramonic SmartRig allow multiple mics into a phone. A mixer (like a small field mixer or the GoXLR-style devices for PCs) gives you real-time control over levels of multiple sources – though mixers are more commonly used in a stationary streaming setup than mobile. For mobile outdoor streams, a compact field mixer that also records (like the Sound Devices MixPre or Zoom F series) can be mounted under the camera. These interfaces/mixers ensure you can use any mic (even high-end XLR ones) with your setup and adjust sound precisely. They also often provide headphone monitoring. The trade-off is extra weight and complexity, plus the need for power (some run on AA batteries or USB power banks). If you’re a solo run-and-gun streamer, adding an interface might be overkill unless you truly need multiple mics or XLR support. But for a professional multi-camera or multi-person outdoor production, an audio mixer is invaluable for managing sound.
- Spare Batteries / Power Solutions: (Bonus accessory) – While not an “audio accessory” per se, keeping your audio gear powered is so important that it’s worth mentioning. For battery-powered mics (like those that use AAAs) or wireless systems, always carry spare batteries. For rechargeable systems, use power banks on downtime or even attach a small power bank to the receiver if it can charge while operating. Some wireless receivers can be powered via USB while in use – a slim battery pack can extend them indefinitely. Missing audio because a battery died is a preventable disaster; plan your power just like you do for your camera or phone.
Equipped with these accessories, your microphone will perform at its best in the field. Wind noise, connectivity issues, and power loss are among the top causes of audio failure in outdoor streams – and each of the above accessories addresses one of those risks. As you build your kit, allocate some budget to these items, not just the microphone itself. They often make the difference between unusable audio and a flawless broadcast.
Top Microphone Recommendations for Outdoor Streaming (2024)
Finally, let’s look at some of the best microphone options for outdoor and mobile IRL streaming as of 2024. These four recommendations have all been rated as “very good” for outdoor use, meaning they deliver clear sound, handle the challenges of outside environments well, and are reliable choices. We’ve split them into two categories: two picks for beginners (affordable, user-friendly) and two picks for professionals (higher-end gear with top performance). Each recommendation includes a brief description and key technical specifications in English.
Best Microphones for Beginners (2024)
1. RØDE VideoMic GO II – Compact On-Camera Shotgun Microphone
The Rode VideoMic GO II is an ultra-lightweight shotgun mic ideal for newcomers who need a straightforward solution for both camera and smartphone. It mounts on your camera’s cold shoe or can attach to a phone rig, and it’s plug-and-play – no batteries required. Despite its small size, it uses Rode’s advanced shotgun design (inherited from their pro mics) to focus on your voice and cut down on side noise. It also has a unique trick: you can use it as a USB microphone. That means you can plug it directly into a smartphone or laptop via USB-C and use it for streaming or recording, bypassing the analog input altogether (great for phones without mic jacks). For an outdoor streamer, the VideoMic GO II offers a perfect blend of simplicity, portability, and sound quality far better than built-in mics.
- Type: Directional condenser shotgun (pressure gradient electret condenser)
- Polar Pattern: Supercardioid (highly focused pickup in front of the mic)
- Frequency Response: 20 Hz – 20,000 Hz
- Connectivity: 3.5 mm TRS output for cameras (uses plug-in power from device); USB-C digital audio interface for direct connection to smartphones, tablets, or computers
- Power: No battery needed – draws power from camera’s mic jack (plug-in power) or from USB connection. Very low power consumption.
- Weight: 89 grams (3.1 oz) – extremely lightweight, won’t strain gimbals or mounts
- Included Accessories: Comes with a detachable shock mount and foam windscreen. (For heavy wind, a furry windshield is available separately.)
- Notable Features: Can work with Rode apps via USB for advanced controls (e.g., high-pass filter, etc.), but in analog use it’s a simple plug-in device with no controls to worry about – great for beginners.
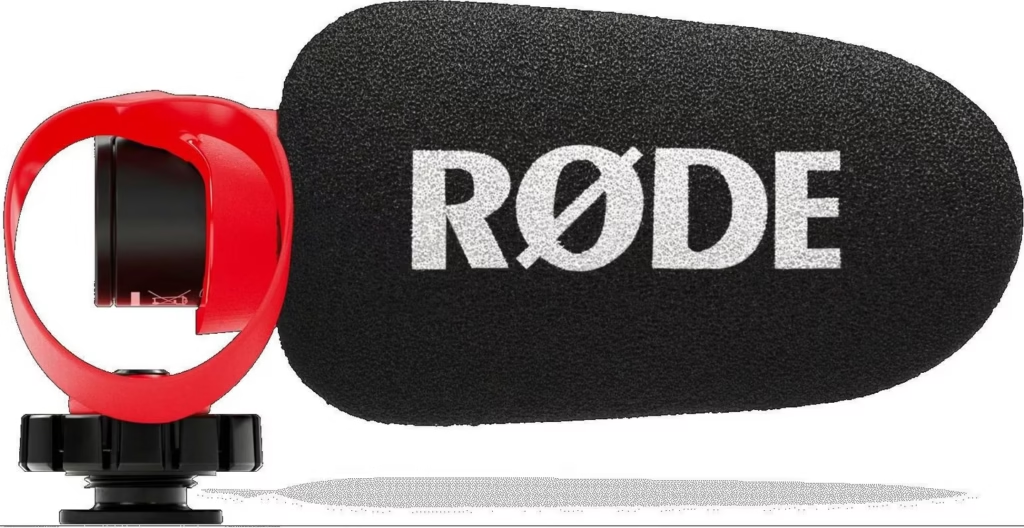
2. RØDE Wireless GO II (Dual Channel Kit) – Wireless Clip-On Microphone System
The Rode Wireless GO II has become a go-to wireless mic system for many creators, and it’s well-suited for beginners who want the freedom of wireless audio. The kit includes two small transmitters (each with a built-in microphone) and one receiver. You can clip a transmitter directly to your shirt as a lavalier-like mic – they’re tiny square units – or plug an external lavalier into them if you prefer a more discreet mic. The receiver sits on your camera or can attach to a smartphone. It’s incredibly easy to set up: automatic pairing and reliable digital transmission with a good range. Beginners will love that you can record two people at once (or use one as a backup) and that the system just works out of the box. Plus, Rode has included an internal recording feature on the transmitters as a safety (so even if you go out of range, the mic itself can keep a recording). Overall, it dramatically improves audio quality for IRL streams compared to any on-camera mic when you’re moving around – your voice stays with you, loud and clear.
- Type: 2.4 GHz digital wireless microphone system with 2 transmitters and 1 receiver. Transmitters have built-in omnidirectional condenser microphones and 3.5mm inputs for optional external lav mics.
- Microphone Polar Pattern: Omnidirectional (captures sound from all directions – designed for clipping on clothing)
- Frequency Response: 50 Hz – 20,000 Hz (typical for the built-in mic capsule; captures the full range of voice clearly)
- Max Operating Range: ~200 m (around 656 feet) line-of-sight in ideal conditions. Real-world range is shorter with obstacles, but more than enough for typical use (city environments might be 30-50m solid range).
- Battery Life: Up to 7 hours of continuous operation on a full charge. The units recharge via USB-C. You can also operate or top-up power via USB while in use if needed (with a power bank).
- Connectivity (Receiver): 3.5 mm TRS output to plug into cameras or recorders. With a TRS-to-TRRS patch cable (sold separately), it can connect to a smartphone’s headphone jack. Alternatively, the receiver can act as a USB audio interface – plug it into a phone or laptop via USB-C and it can be recognized as an external microphone.
- Notable Features: On-board recording (each transmitter has internal memory for over 24 hours of audio, wav files up to 48kHz/24-bit, accessible via software), safety channel (can record a secondary track at lower volume to prevent clipping), and app-controlled settings (via Rode Central app). It also comes with two furry windshields that twist-lock onto the transmitters to reduce wind noise on the built-in mics – essential for outdoor use.
- Size/Weight: Transmitters and receiver each weigh 30 g (1.06 oz) – very light. The form factor is a small square (~4 cm each side), easy to conceal or clip on.
(Why it’s great for beginners: The Wireless GO II offers professional-grade capabilities (many pros use it) in a user-friendly package. You don’t need to know about frequency channels or audio tech – just turn on and go. Managing two transmitters is also straightforward, making two-person streaming feasible for a beginner. It’s a bit of a higher investment for an entry-level user, but given the versatility and quality, it’s often recommended as one of the first upgrades for content creators looking to improve audio.)
Best Microphones for Professionals (2024)
3. RØDE Wireless PRO – Advanced Dual-Channel Wireless Microphone System
For those wanting the cutting edge in wireless audio tech, the Rode Wireless PRO is a top contender in 2024. It takes the foundation of the Wireless GO II and elevates it for professional needs. You still get two compact transmitters and one receiver, but now the system boasts 32-bit float on-board recording (meaning it can record audio internally without ever clipping, capturing a huge dynamic range), timecode synchronization for perfect alignment in post-production, and improved transmission range and stability (up to 260 m line-of-sight). The Wireless PRO kit conveniently includes two high-quality lavalier microphones in the box, which you can plug into the transmitters for a more traditional setup. It also comes with a smart charging case – just like earbuds – that charges all components on the go. For a professional IRL streamer or videographer, this system offers peace of mind: even if your wireless signal encounters interference, the transmitters are recording everything in pristine quality. The Rode Wireless PRO is reliable enough for serious jobs and yet still compact and easy to use in the field.
- Type: Dual-channel 2.4 GHz digital wireless system (successor to the Wireless GO series) with enhanced features. Two bodypack transmitters (with built-in mics + lav inputs) and one camera-mount receiver.
- Microphone: Omnidirectional condenser capsules in each transmitter (same form factor as Wireless GO II’s built-in mic). Also compatible with external lavaliers (3.5mm TRS connection with locking screw thread for security).
- Max Range: Up to 260 m (853 feet) line-of-sight. Improved signal reliability with Rode’s Series IV digital transmission and adaptive frequency hopping.
- Internal Recording: 32-bit float recording on each transmitter, with 32 GB internal memory (over 40 hours of audio storage per transmitter). 32-bit float means you don’t have to set gain for the recording – it can capture extremely loud and quiet sounds without distortion, and you adjust levels later on computer. This is a game-changer for professionals dealing with unpredictable audio levels.
- Battery Life: ~7 hours per charge on transmitters/receiver. The included charging case can recharge the system fully ~2 times, providing up to 21 hours of use before you need external power. You can charge via USB-C, and the receiver can also be powered via USB continuously if attached to a streaming rig.
- Timecode: Supports timecode input to the receiver (via 3.5mm) and wirelessly syncs timecode to transmitters. This is useful for multi-camera shoots to align audio precisely in post. For live streaming, timecode is less crucial, but it underscores the pro nature of the device.
- Connectivity: The receiver offers a 3.5mm analog output (with selectable output level to match camera or line inputs) and can also act as a USB audio interface. It has a bright display and on-board controls for gain, mute, etc. The system also has a headphone output on the receiver for real-time monitoring – a valuable feature if your camera or phone rig lacks a headphone jack.
- Included Accessories: Two Rode Lavalier II microphones (premium low-profile lav mics) with foam windscreens, magnetic clips, etc.; three furry windshields for the transmitters; all necessary cables (analog TRS cable, USB-C cables, Lightning cable for phones); the charging carry case.
- Notable Features: GainAssist auto-gain functionality (the system can automatically adjust levels to prevent clipping in live output), safety channel recording, encryption of wireless signal for security, and app integration (for configuring settings via Rode Central or Rode Connect software).
- Weight: Transmitters ~30 g each, receiver ~40 g; case with all components ~300 g. Still very portable for what it offers.
(Why it’s great for pros: The Wireless PRO is basically a full audio kit in your pocket – wireless freedom plus backup recording that’s virtually foolproof. Professionals can rely on it for critical shoots, but it’s still compact enough for solo streamers who want the best. The inclusion of high-end lav mics means out-of-the-box the sound quality is excellent. It’s an investment, but for 2024 it’s among the best in the wireless category for ease and features.)
4. Sennheiser MKE 600 – Professional Shotgun Microphone
The Sennheiser MKE 600 is a short shotgun microphone renowned for its broadcast-quality sound and robust build, making it a fantastic choice for professional outdoor streaming, videography, and filmmaking. Unlike the small on-camera mics, the MKE 600 is a step into the professional shotgun realm: it’s larger and uses an XLR output, which typically offers lower noise and higher fidelity. However, Sennheiser designed it to be versatile – it can run on phantom power or a single AA battery, allowing it to plug into cameras and even adapt to 3.5mm inputs (with an adapter cable) if needed. This mic excels at capturing speech with clarity and rejecting unwanted background noise and reverb, thanks to its highly directional supercardioid/lobar pickup pattern. In windy or noisy outdoor settings, the MKE 600 paired with a proper windshield will outperform most smaller mics, giving you crisp audio from your subject. Professionals appreciate its low self-noise and high max SPL, meaning it introduces very little hiss and can handle loud sounds without distortion. Whether you mount it on a camera, a stand, or use it on a boom pole just out of frame, the MKE 600 delivers reliable, high-quality audio for your streams.
- Type: Shotgun interference-tube microphone (pre-polarized condenser capsule) for camera/boom use. XLR output connector.
- Polar Pattern: Super-cardioid / Lobar (very directional forward focus, with minimal pickup from sides and rear). Ideal for isolating sound in front of the mic and reducing noise from the environment.
- Frequency Response: 40 Hz – 20,000 Hz. It captures the full vocal range, with a slight emphasis on mid-to-high frequencies to ensure speech clarity. It also has a switchable low-cut filter (at 100 Hz) to reduce low-frequency rumble (for instance, wind or traffic noise) when needed.
- Sensitivity: ~21 mV/Pa (with phantom power) – meaning it outputs a strong signal, which helps achieve a good signal-to-noise ratio. With battery power, sensitivity is about 19 mV/Pa (slightly reduced, but still very good for a camera mic).
- Max Sound Pressure Level: 132 dB SPL (phantom powered) / 126 dB SPL (battery) – capable of handling very loud sounds without distortion (useful if streaming live music or loud events).
- Power Options: +48 V phantom power from professional recorders/cameras or AA battery power (1x AA, which provides approximately 150+ hours of operation). This dual power design means you can use it with pro gear or consumer cameras. When battery-powered, you can connect via an XLR-to-3.5mm adapter to a DSLR or even to a smartphone (with appropriate adapters/interface).
- Dimensions: ten inches (256 mm) in length. Weight is about 128 g (4.5 oz). It’s longer and heavier than tiny on-camera mics, but still compact for a professional shotgun.
- Mounting: It does not come with a shoe mount by default (often packaged with a basic shock mount depending on retailer). Professionals often use a separate shock mount or pistol grip handle. For on-camera use, you’d use an XLR adapter (like a mini XLR preamp on the camera) or route it into a recorder.
- Included Accessories: Foam windshield and a shock-absorbing mounting clip are typically included. For outdoor use, a blimp or furry windshield (Sennheiser MZH 600) is recommended (sold separately) to tackle wind noise effectively.
- Audio Quality: Rich, natural sound with low self-noise (the mic’s self-noise is around 15 dB(A), which is quite low – meaning it adds very little hiss). Users praise how it makes dialogue stand out clearly, even against ambient outdoor sounds.
- Use Case: You can use the MKE 600 directly on a professional cinema camera or mirrorless (with XLR adapter). For a mobile streamer setup, you’d likely connect it to a small field recorder or audio interface which then feeds your stream. It’s perfect if you want to capture your voice with maximum quality or if you sometimes record videos in addition to streaming.
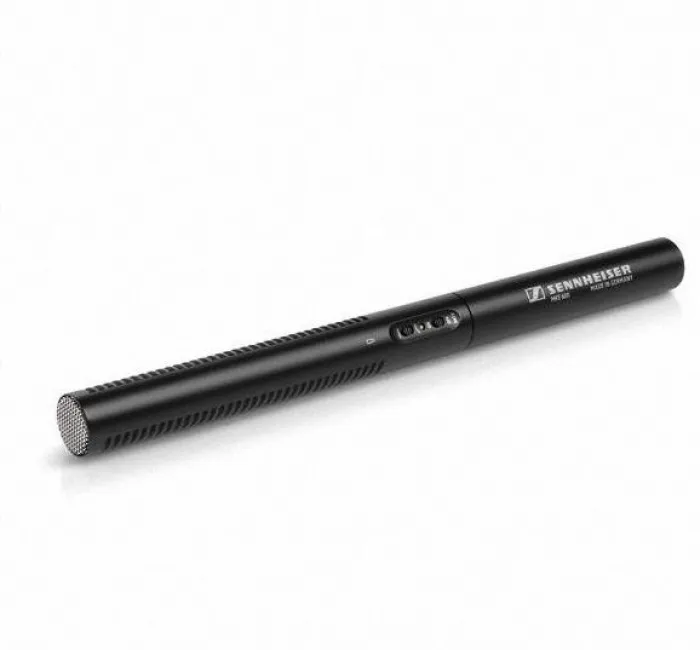
(Why it’s great for pros: The Sennheiser MKE 600 offers a balance of top-tier sound and flexibility. It’s more affordable than ultra-high-end shotguns like the famed Sennheiser MKH 416, but in outdoor scenarios it comes very close in performance. Professionals choose it for its reliability – it’s less prone to RF interference, works in various weather, and produces consistent results. If your streaming involves a lot of talking in varied outdoor environments – from quiet parks to busy streets – this mic will elevate the clarity of your audio. Just note that to use it optimally in a mobile setup, you’ll need the proper adapters or recording gear as mentioned.)
Summary: The microphones and systems above are among the best in their categories for tackling the challenges of outdoor and mobile IRL streaming. Beginners can achieve a remarkable improvement in audio with simple gear like the VideoMic GO II or Wireless GO II – these will eliminate the muffled, distant sound of built-in mics and make your streams sound far more professional and engaging. For those who demand even more (and are willing to invest), the Rode Wireless PRO and Sennheiser MKE 600 represent professional solutions that offer superb audio quality, reliability, and advanced features that can handle almost any scenario thrown at them in 2024. With the right microphone and accessories in your kit, you can ensure your viewers hear every word and experience the atmosphere of your outdoor streams without the distraction of wind or noise. Good audio elevates live content significantly – so whichever level you’re at, choosing a suitable microphone is a step well worth taking. Happy streaming, and may your adventures sound as great as they look!