
DYI – IRL Backpack
Building a Comfortable IRL Livestreaming Backpack on a Budget
DYI – IRL Backpack, let´s go! Live streaming “In Real Life” (IRL) can be an incredible way to share your adventures and daily life with the world. To do it well, many streamers use a special IRL livestreaming backpack – a portable setup that lets you broadcast high-quality video from anywhere. If you’ve seen professional IRL streamers, you might think their gear costs thousands of dollars. The good news is that you can build your own IRL streaming backpack as a beginner for around $500 to $1000. In this guide, we’ll walk you through everything you need to know to create a comfortable, efficient backpack streaming rig. We’ll cover all the components you’ll need, why we chose them with cost and performance in mind, how to put it all together, and tips for keeping the stream stable and yourself comfortable during long broadcasts. Let’s get started!
Table of Contents
Planning Your IRL Streaming Backpack
Before diving into the parts list, take a moment to plan out what you want from your IRL streaming backpack. Here are a few considerations:
- Budget: We’re aiming for a build between $500 and $1000. This means we’ll prioritize cost-effective components that give the best performance for the price. Every dollar counts, so we’ll only include what’s necessary for a solid streaming experience.
- Streaming Quality: Decide on your target video quality (e.g. 720p or 1080p, 30fps or 60fps). Higher quality requires more processing power and stronger internet bandwidth. In this guide, we’ll assume you want smooth 720p or 1080p HD streaming with minimal buffering. Our component choices will reflect that.
- Portability and Comfort: Since you’ll be wearing this backpack for potentially hours at a time, weight and comfort are crucial. We’ll discuss weight distribution, padding, and airflow to make sure the backpack doesn’t become a burden. A slightly heavier pack might be okay if the weight is well-balanced and the backpack is ergonomic.
- Reliability: IRL streaming can be unpredictable (network dead zones, weather, long hours). We will plan for reliable connectivity (including multi-SIM cellular bonding), sufficient battery life, and contingencies for common issues. The goal is a setup that keeps your stream live as much as possible, even if conditions change.
By keeping these factors in mind, you can make informed choices when selecting your gear. Now, let’s break down the complete list of components you’ll need and explain why each is important.
Essential Components and Equipment
To build a successful IRL streaming backpack, you’ll need several key components working together. Below is a complete list of the parts and what to look for in each. We’ll also give example choices that fit our budget and balance performance with cost.
- Camera: This is your video source. You have a few options for an IRL camera:
- Action Camera (Recommended): Small IRL action cams (like a GoPro or DJI Osmo Action) are popular for IRL streaming. They’re durable, lightweight, and offer wide-angle lenses with excellent stabilization (so your footage stays smooth even while you walk or run). For example, a used GoPro Hero 8 or Hero 9 can cost a few hundred dollars and provides high-quality 1080p video with built-in stabilization. Action cameras often handle varied lighting well and can be mounted easily on a backpack or a selfie stick. We choose an action cam because it gives great video quality for its size and cost, and it’s built to handle outdoor conditions.Smartphone Camera: If you have a modern smartphone with a good camera, you can use it as your streaming camera. Phones like an iPhone or a recent Android have excellent video capabilities (often 1080p or 4K with stabilization). Using a phone you already own is budget-friendly (essentially $0 extra cost) and simplifies the setup because the phone can also act as the streaming device (more on that later). The downside is that phones can overheat when streaming for long periods, and you might need to secure it on a mount. But for beginners, a smartphone is a very convenient option.Mirrorless/DSLR Camera (Optional Upgrade): For the highest video quality, some streamers use a small mirrorless camera (like a Sony Alpha series or Canon M50). These cameras have larger sensors for better image quality and low-light performance. However, they are more expensive (often $500+ for the camera body and lens) and heavier. They also require a capture card and a constant power source. For our $500–$1000 budget, a mirrorless camera setup is likely too costly and heavy, so it’s not our first choice. But keep it in mind as a future upgrade if you want to improve image quality later on.
- Encoder / Streaming Device: This is the “brain” of your backpack that takes the video from your camera and broadcasts it live over the internet. There are a couple of ways to handle encoding and streaming:
- Smartphone-Only Setup: The simplest approach is to use your smartphone for both capturing video and encoding/streaming the video to the internet. Apps like Streamlabs, Prism Live, or Larix Broadcaster can stream directly from your phone’s camera to platforms like Twitch or YouTube. If you choose this route, you actually combine the camera and encoder into one device (your phone). This minimizes equipment and weight. However, using one phone for everything can strain it (CPU usage, heat, battery drain) and limits your ability to use the phone for other tasks (like reading chat or navigation) while streaming. It also typically can only use one cellular connection at a time (we’ll address multi-SIM bonding in a later section).Dedicated Encoding Device (Recommended): For better performance and flexibility, many builders use a dedicated device in the backpack to handle video encoding and streaming. This device can be a small single-board computer or mini PC that you carry in the backpack. Two popular choices are:
- Raspberry Pi 4: An affordable mini-computer (around $50-$80) that is capable of streaming 720p or 1080p video with the right setup. It has 4 USB ports for connecting cameras and modems, and it’s energy-efficient. You can run Linux on it with software like OBS Studio or custom scripts (for advanced users) to stream. The Pi 4 even has hardware encoding for H.264 video which helps in streaming smoothly. It’s a cost-effective DIY solution to act as your encoder and also manage multiple internet connections (via software like Speedify, which we’ll cover).NVIDIA Jetson Nano or Other SBCs: Boards like the Jetson Nano, or newer ones like the Orange Pi 5, are slightly more expensive ($100-$200) but come with more powerful processors or GPUs for video encoding. For instance, the Jetson Nano has an NVIDIA GPU that can handle 1080p encoding efficiently and is used in some community IRL backpack projects. These boards can run specialized software (such as BELABOX, an IRL streaming software package) that not only encodes video but also bonds multiple network connections. If you’re a tinkerer, this can be a fun project and can yield performance close to professional solutions at a fraction of the cost.Dedicated Hardware Encoder (LiveU Solo, etc.): There are commercial devices like the LiveU Solo or Teradek Vidiu Go that are purpose-built for live streaming and bonding. They are very reliable and easy to use, but they are expensive (a LiveU Solo unit is around $1000 just for the device, not including modems or subscription services). In a $500-$1000 budget build, these are generally too costly. Instead, we emulate much of their functionality with the Raspberry Pi or Jetson approach.
- Smartphone-Only Setup: The simplest approach is to use your smartphone for both capturing video and encoding/streaming the video to the internet. Apps like Streamlabs, Prism Live, or Larix Broadcaster can stream directly from your phone’s camera to platforms like Twitch or YouTube. If you choose this route, you actually combine the camera and encoder into one device (your phone). This minimizes equipment and weight. However, using one phone for everything can strain it (CPU usage, heat, battery drain) and limits your ability to use the phone for other tasks (like reading chat or navigation) while streaming. It also typically can only use one cellular connection at a time (we’ll address multi-SIM bonding in a later section).Dedicated Encoding Device (Recommended): For better performance and flexibility, many builders use a dedicated device in the backpack to handle video encoding and streaming. This device can be a small single-board computer or mini PC that you carry in the backpack. Two popular choices are:
- Capture Card (if using an external camera): If you are not using a smartphone as the camera (for instance, if you chose a GoPro or action cam, or a mirrorless camera), you will need a video capture device to get the camera’s feed into your encoder. A capture card converts the camera’s HDMI output into a USB video stream that a computer (like the Raspberry Pi or Jetson) can read. There are two main types:
- USB HDMI Capture Dongles: These are small adapters that plug into a USB port and have an HDMI input. They range in price from very cheap (under $20 for basic 1080p30 capture devices) to high-end (over $100 for brands like Elgato Cam Link which can handle 1080p60 or 4K input). For a budget build, a generic 1080p USB capture dongle works surprisingly well for capturing an action cam’s feed. They might not support very high frame rates, but 30fps or 60fps at 720p/1080p is typically fine.
- Built-in Camera Streaming: Some action cameras and phones can output video over USB directly (or even stream via WiFi or RTMP). For example, GoPro cameras can act as a webcam over USB in a pinch, and certain models have apps or features to live-stream without a capture card. However, using a dedicated capture card is often more reliable and lower latency.
- Battery and Power Solutions: All this gear needs power to run, and since you’ll be mobile, battery power is the way to go. A robust portable battery pack (power bank) is one of the most important components for long-term streaming. Here’s what to look for in a battery solution:
- High Capacity: Streaming equipment draws a lot of power, so you’ll want a battery pack with a large capacity to sustain hours of use. We recommend at least a 20,000 mAh (milliamp-hour) battery pack, which at 5 volts translates to roughly 100 Wh (watt-hours) of energy. This could run a moderate setup for several hours. If you aim to stream all day, you might consider carrying multiple 20,000 mAh packs or one bigger pack (some are 26,800 mAh or even 30,000+ mAh). Keep in mind larger capacity means more weight, so find a balance that suits the length of your typical stream.
- Multiple Outputs and High Output: Ensure the battery pack can supply power to multiple devices at once. Many high-capacity banks have at least two USB output ports, sometimes more. For example, you might need to power your encoder (via a USB-C or microUSB cable) and simultaneously power your camera (if your camera can be powered or charged while in use) or a secondary phone/hotspot. Check the output specs: a good pack can output 2A or more per port (5V 2.4A is common per port, or if it supports USB-C Power Delivery it might do 9V or 12V for certain devices). Our build mostly uses standard 5V USB-powered devices, so a pack that can provide 5V at 3A (15W) on one port and another 5V 2A on another port, for example, would be ideal.
- Swappable or Multiple Batteries: Consider whether you want to do quick battery swaps during a stream. One strategy is to have two battery packs: use one until it runs low, then switch to the second one. To swap without cutting power to your devices, you can momentarily plug the second battery in parallel (if your devices can accept input from two sources safely – some advanced users use diode isolators or UPS modules for this). However, a simpler approach is to plan a short break in your stream to power down and swap batteries when needed. In any case, having at least one spare battery ensures you’re not completely out of power if one pack depletes.
- Mounting and Form Factor: Some battery packs are heavy bricks, others are slimmer. A slim, flat battery pack can sit more comfortably in a backpack against your back, whereas a thick brick might poke out. Also, you might use velcro or straps to secure the battery inside the backpack so it doesn’t move. We’ll talk about placement in the comfort section.
- Mobile Internet: Modems, Hotspots and SIM Cards: To livestream from anywhere, you need a robust internet connection in your backpack. This typically comes from cellular networks (4G/LTE or 5G). Since we want maximum reliability and high bitrate, we’ll use multiple cellular connections (from different carriers) and bond them together. Here’s what you need for connectivity:
- SIM Cards and Data Plans: Secure at least two separate SIM cards with generous data plans. Ideally, use different mobile carriers for each SIM. For example, one SIM from Carrier A and another from Carrier B. The reason is that coverage and speed will vary by location; having multiple carriers ensures that if one network has a weak spot, the other might still be strong. Look for unlimited or high-cap data plans (streaming video can consume around 2-3 GB per hour at 6 Mbps bitrate). Some carriers offer prepaid unlimited data SIMs or special data-only plans. Keep an eye on any throttling or hotspot restrictions – we want plans that allow continuous video streaming.USB Cellular Modems (Dongles): One way to use those SIM cards is to get unlocked USB LTE modems for each SIM. These dongles plug into your encoder device (e.g., Raspberry Pi via USB) and provide a data connection. Many generic 4G USB modems exist; just make sure they support your carriers’ bands. They usually appear to the computer as a network interface once configured. USB dongles are compact and powered by the host device’s USB port. However, be mindful that some dongles can draw significant power and may get warm – ensure your battery and USB ports can supply them (the Pi can usually handle a couple of dongles; if not, a small powered USB hub might be needed).Mobile Hotspot Devices: Another option is to use portable hotspot devices (sometimes called MiFis or pocket routers) for your SIMs. For example, a Netgear Nighthawk M1/M2 or a Huawei 4G hotspot. These devices have their own battery and can share internet via WiFi or USB tethering. In a backpack, you can either connect them via USB to your encoder or simply connect via WiFi. The advantage of hotspots is that they often have built-in antennas for decent reception and they don’t draw power from your main system (since they have their own battery, though you can also plug them into the power bank to keep them charged). The downside is cost – a good hotspot might cost $150-$300 each. For our budget build, a mix of one hotspot and one USB modem, or using spare old smartphones (next point), could be a cost-effective strategy.Tethered Smartphones: If you have an old smartphone (or a friend’s spare) that supports your chosen carrier, you can use it as a makeshift modem by enabling USB tethering or WiFi hotspot on it. For example, you could place a SIM in an old Android phone, turn on USB tethering, and connect it to your Raspberry Pi via USB. The phone will act as a modem, and the Pi can use its internet. This is effectively the same as a USB modem but can sometimes be more reliable (phones have good antennas and radio hardware). The phone will use its battery, but you should plug it into the power bank to keep it charged while tethering (tethering can drain phone battery quickly). Using existing phones is budget-friendly since you may not need to buy new hardware, just ensure the phones are unlocked and compatible with the SIM networks.
- Cables and Accessories: Don’t overlook the small items – the right cables and accessories ensure your rig runs smoothly and neatly. Here are the key accessories you’ll need to integrate everything:
- USB Cables: A few short USB cables will be used for power and data. For example, a USB-C or Micro-USB cable to power the Raspberry Pi from the battery pack, USB cables to connect USB modems or phones, and potentially a cable to power your camera (some cameras can be powered via USB while in use). Keep cable lengths short where possible (1 to 2 feet) to reduce clutter and voltage drop. It’s good to have a couple of spare cables in case one gets flaky; USB cables are inexpensive.
- HDMI Cable: If using an external camera with a capture card, you’ll need a Micro HDMI to HDMI or Mini HDMI to HDMI cable (depending on the camera’s output port type). For example, GoPro cameras with a Media Mod use a Micro HDMI out, so you’d get a Micro HDMI to standard HDMI cable to connect to the capture card. Choose a cable that is just long enough to go from your camera mount to the backpack – usually around 3 feet or so is sufficient if the camera is on your shoulder strap. Look for a cable with a right-angle connector on at least one end; this can help make the connection more low-profile (for instance, a right-angle plug at the camera so the cable runs flush along your body, rather than sticking straight out).
- Audio Cables/Adapters: If you plan to use an external microphone (discussed below in Audio section), you may need a specific cable or adapter. For example, a 3.5mm TRS cable from a microphone receiver to your camera or encoder. If your camera has a mic input jack, get the appropriate adapter (GoPro’s Media Mod or audio adapter, or if using a phone, a TRRS to USB-C adapter if it lacks a headphone jack). Make sure these are securely connected and of good quality to avoid crackling audio.
- Velcro Straps or Zip Ties: These are extremely handy for cable management. You’ll want to tidy up excess cable lengths and strap down devices in your bag. Reusable velcro cable ties are great because you can easily add or remove them without cutting. Use them to bundle cables and attach them to loops in the bag so nothing is dangling or moving freely. Small zip ties can also secure cables in place along straps (just be careful not to over-tighten onto a cable and damage it). We’ll go into cable management tips later, but having a pack of these ties is essential.
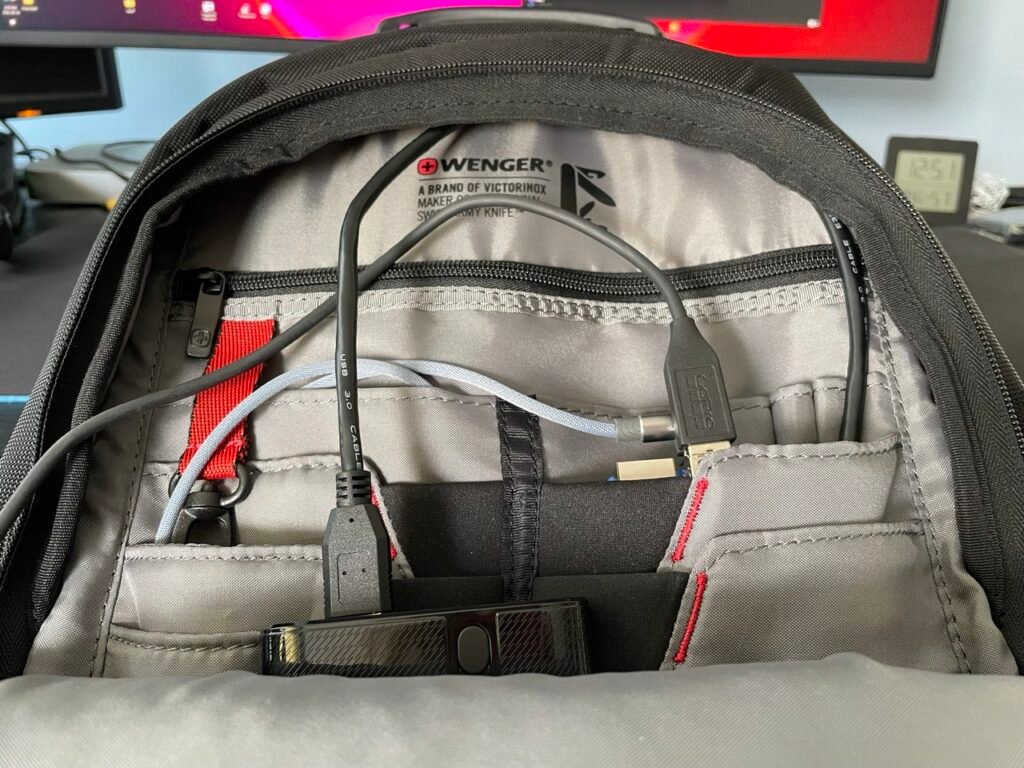
- Organizer Pouch or Panel: To keep all the small devices (Pi, capture card, modems, etc.) arranged neatly inside the backpack, consider using an organizer. One popular option is a GRID-IT organizer, which is a flat panel with elastic straps where you can tuck in devices and cables. This keeps everything in one flat, secured layer that you can slide into the backpack. Alternatively, use small padded pouches or even Velcro patches inside the backpack to hold components in place. The goal is to prevent your gear from jumbling around and to allow some airflow between devices (rather than stacking them tightly).
- Spare Batteries and Misc.: If any of your devices have their own batteries (camera, wireless mic, etc.), carry spares if possible. Also, include a portable charger for your phone (if you use your main phone for chat or as a camera, have a way to top it up too). A small tool kit is optional but can be useful: e.g., a screwdriver, some gaffer tape (great for quick fixes or strapping down a cable externally), and maybe a backup SD card for your camera or Pi.
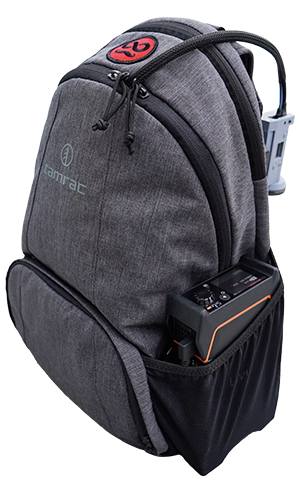
- Backpack and Mounting Gear: Lastly, you need the backpack itself and mounts to hold your camera (and possibly microphone) in place. The choice of backpack affects comfort and how well you can organize the components. Here’s what to consider:
- Backpack Choice: Look for a compact backpack that has enough room for your equipment and offers good comfort features. A small to medium camera backpack or daypack (around 20-25 liters capacity) is usually sufficient. Key features to look for: padded shoulder straps, a chest strap and/or waist belt (these help distribute weight off your shoulders), and some internal compartments or at least attachment points for organizing gear. A backpack designed for laptops or cameras often has padding which can protect your devices and also has dividers you can repurpose. Also consider a pack with a mesh back panel or ventilation channels – streaming outdoors can get warm, and a sweaty back is uncomfortable, so airflow is a bonus.
- Weight Distribution: The backpack should allow you to place the heavy items (like the battery pack) low and close to your back. Many backpacks have a compartment against the back for a laptop; you can put the battery there instead. Keeping heavy items centered and low helps maintain your balance and reduces strain. We’ll discuss packing layout soon, but ensure the backpack isn’t too tall or saggy; a snug fit to your back is ideal.
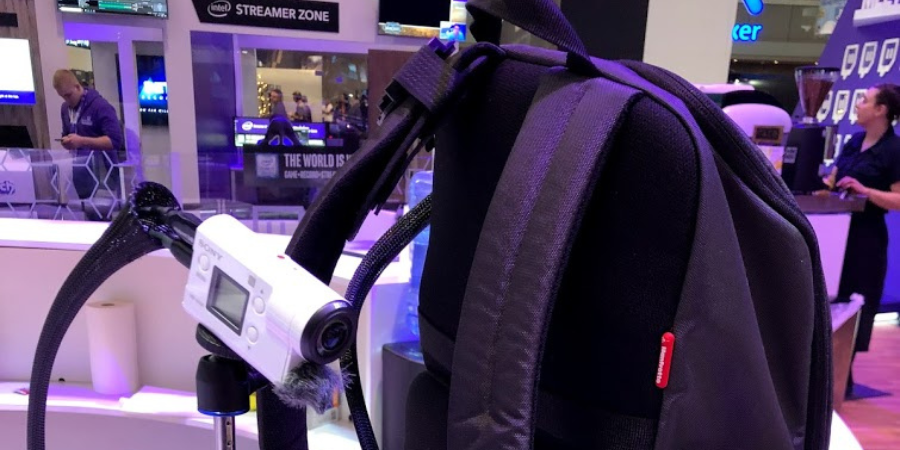
- Camera Mount: Decide how you want to mount your camera for streaming. Common mounting methods include:
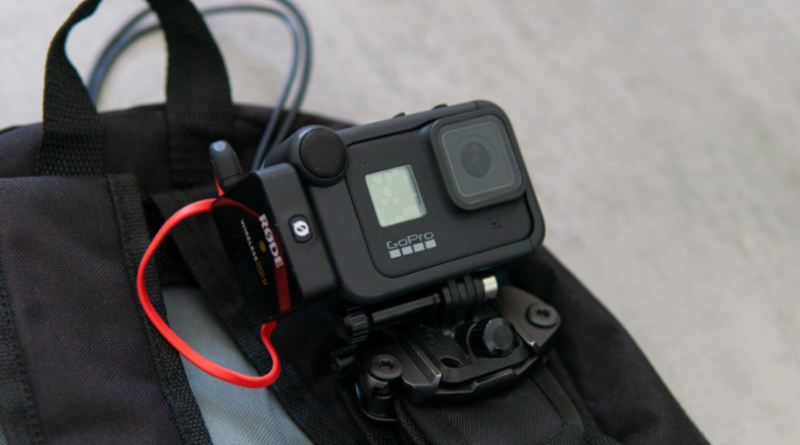
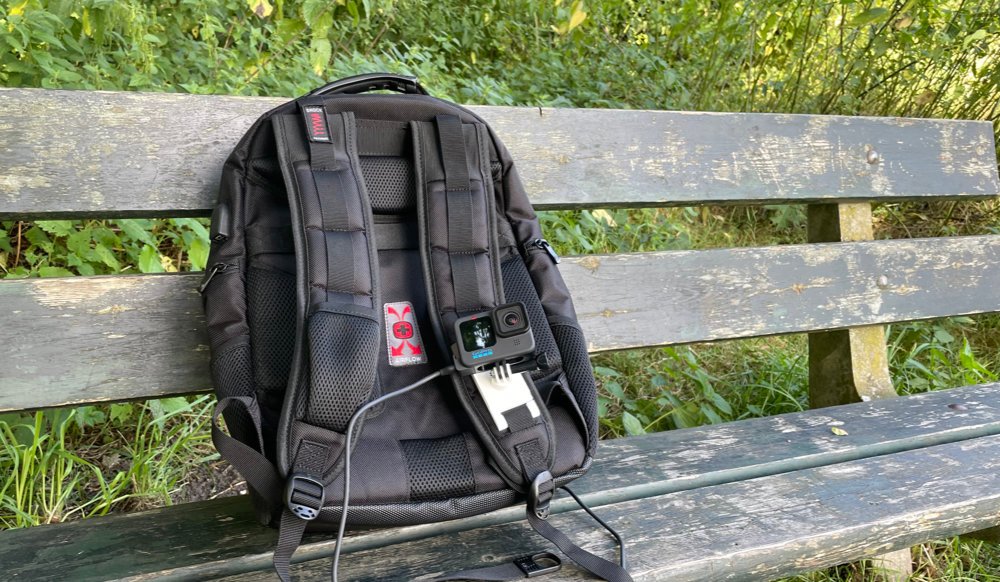
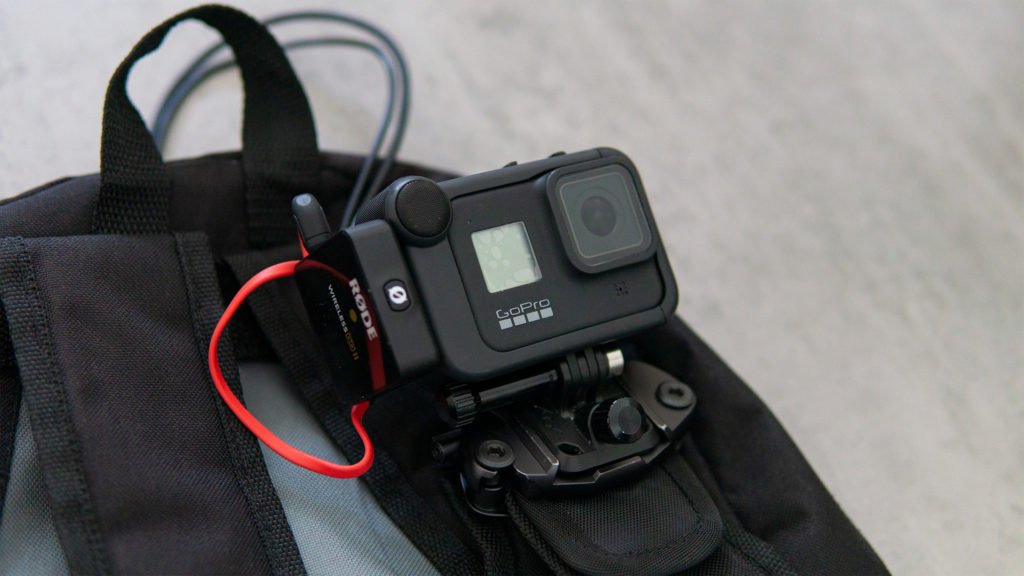
- Shoulder Strap Mount: For action cameras, you can get a shoulder strap clip or mount (some action cams come with accessory clips) that attaches the camera to your backpack’s shoulder strap at chest height. This gives a “first-person” perspective and keeps your hands free. Make sure the mount is secure and the camera is stabilized (many use a rubber-backed plate that grips the strap to avoid wobble).
- Chest Harness: Alternatively, you can use a chest harness (the kind used for GoPros in sports), which straps around your torso and places the camera in the middle of your chest. This is very secure and stable, though it’s another piece of gear to wear. If comfort is a priority and you don’t mind wearing the harness, it’s a good way to distribute the camera weight and it works well with action cams.
- Selfie Stick or Tripod Mount: Some streamers prefer holding a selfie stick or a small handheld tripod with the camera, then tethering that to the backpack with a cable. This allows more control over camera angles (you can point it at yourself or around easily). If you go this route, consider a telescoping stick that can shorten and attach to the backpack when you need both hands free. Also ensure your HDMI or USB cable from the camera has enough slack and is routed safely if you’re moving the camera around on a stick.
- Phone Mount (if using phone camera): If your phone is your camera, you might get a special mount or clamp for it. Options include chest mounts that hold a phone, or a neck mount (some creators use a neck-mounted holder), but a sturdy handheld gimbal or selfie stick is often used to keep phone video stable. A 3-axis gimbal for a phone will dramatically improve smoothness, but it does add cost (~$100) and weight. For a budget build, you can also rely on the phone’s internal stabilization and just use a basic phone clamp on a short handle. Remember to secure the phone with a tether or wrist strap if it’s outside – you don’t want it dropping.
- Microphone Mount: If you use a shotgun microphone (small directional mic), you may mount it on the camera or on your shoulder strap. Tiny action cam mics or phone mics can use cold shoe mounts or clamps. A lapel (lavalier) mic or headset just attaches to your clothing. We’ll talk more about audio soon, but plan how the mic and its cable/receiver will be placed so it’s not swinging around.
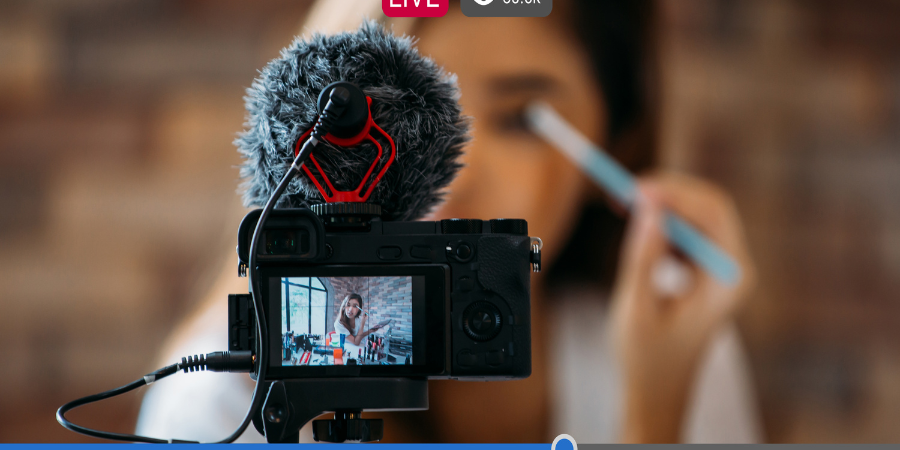
- Audio Gear (Optional but Recommended): While the prompt didn’t explicitly list it in the components, audio quality is just as important as video for a good stream. We highly recommend adding:
- External Microphone: The built-in mics on cameras or phones often pick up a lot of ambient noise and can sound distant or muffled, especially in noisy outdoor environments. A dedicated microphone will greatly improve clarity. For IRL, a wireless lavalier (lapel) mic is a popular choice – you clip the small mic to your shirt near your collar, and the transmitter sends audio to a receiver on your backpack or camera. Wireless kits (like Rode Wireless GO or more budget-friendly options) can cost around $100-$200, but there are cheaper ones in the $50 range that still do a decent job. Alternatively, a shotgun mic (a small directional mic) mounted on your camera or shoulder can pick up your voice while filtering some noise; these plug directly into the camera or encoder. A basic compact shotgun mic (like the Rode VideoMicro) is around $50.
- Wind Protection: If streaming outdoors, wind noise can ruin audio. Foam covers or furry “dead cat” windscreens for your mic are essential to cut down wind rumble. Many mics include one, but if not, you can buy a universal windscreen cheaply.
- Audio Adapters: Make sure you have any needed adapters (mentioned in cables section) to plug the mic into your system. For example, if using a GoPro with Media Mod, it has a 3.5mm mic jack. If using a phone, you might need a USB-C to 3.5mm adapter. Test that the audio from the mic is recognized by your streaming setup.
Now that we’ve listed all the components and why each is chosen, let’s move on to assembling everything step-by-step. We’ll integrate the camera, encoder, power, and connections and ensure it all works together.
Assembly and Integration: Step-by-Step Setup
Building the backpack might seem daunting, but we’ll break it down into manageable steps. Follow these detailed instructions to assemble your IRL streaming backpack and get it ready for action:
1. Prepare the Camera and Mount:
- Setup Camera Settings: Before physically mounting the camera, turn it on and adjust important settings for streaming. Set the resolution and frame rate you plan to use (for example, 1080p at 30fps, or 720p at 60fps depending on your preference and bandwidth). Enable any stabilization features if using an action cam. Also, disable any automatic power-off or sleep timers so the camera doesn’t shut off mid-stream. If the camera has Wi-Fi or other features that you won’t use, you can turn those off to save power and reduce heat.
- Attach Necessary Mods/Adapters: If your camera requires a mod for output (e.g., the GoPro Media Mod for HDMI out, or an adapter cable), attach those now. Make sure the output (HDMI or USB) is firmly connected. For example, connect the micro HDMI cable into the GoPro’s port or your mirrorless camera’s HDMI-out.
- Mount the Camera: Attach the camera to your chosen mount. If using a backpack shoulder strap clip, secure it around the strap at about chest height. Ensure the camera is right-side up and angled correctly (you might need to adjust the tilt so that the horizon is level in the frame). If using a chest harness, put it on and tighten it comfortably, then screw the camera onto the harness mount. For a selfie stick, mount the camera/phone in its clamp and either hold it or attach the stick to your backpack with clips when not actively in use. Tip: After mounting, do a quick test by wearing the backpack or harness and see what the camera is pointing at. You might record a short video or look at the live preview (if the camera has a screen or through a phone app) to ensure your head isn’t cut off and that you have the desired viewpoint.
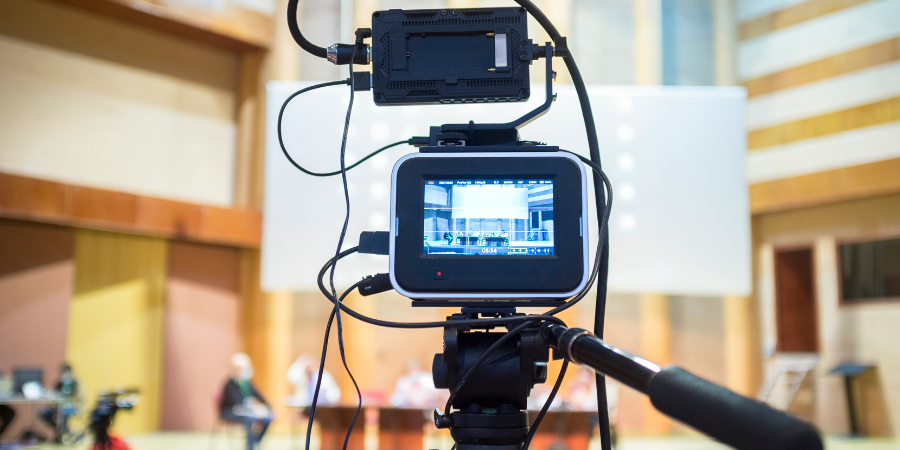
2. Set Up the Encoder (Streaming Device):
- Install Software: If you’re using a Raspberry Pi or similar mini-computer, prepare a microSD card with the operating system (e.g., Raspberry Pi OS). Boot it up and install the necessary streaming software. A lightweight approach is to use a command-line streaming tool (FFmpeg) to push the video to your streaming platform, or you can install full GUI programs like OBS Studio if you plan to connect a screen occasionally for setup. Many IRL backpack DIYers use special scripts or programs; for example, with a Pi you might use Speedify for bonding plus FFmpeg for encoding, or on a Jetson running BELABOX software which has its own setup process. Follow the software instructions for your chosen solution: for Speedify, you’d install the Speedify bonding software and create an account; for BELABOX, you’d flash their image and set up their cloud link.
- Configure Streaming Settings: Input your stream credentials (like your Twitch stream key or YouTube RTMP URL) into the encoding software. If using OBS, set up a headless profile that auto-starts on boot to stream the HDMI capture input at your chosen bitrate. If using a phone as the encoder, install your streaming app and log in to your account, setting the stream title, resolution, and bitrate in the app’s settings. We recommend starting with a moderate bitrate (e.g., 4000 kbps for 720p, or 5000-6000 kbps for 1080p) to test stability. You can adjust this based on how your bonded connection performs.
- Test Local Preview: It helps to test the setup with a single connection first on a local network. For instance, connect the Pi or device to your home Wi-Fi (or use a monitor and keyboard for initial setup if needed) and verify that the capture card is recognized and the camera feed appears. On a Raspberry Pi, a command like
v4l2-ctl --list-devicescan show if the capture card is listed, and you can test capturing a few frames or using a test application. On a phone, just open the camera view in your streaming app to see that it’s working. In short, ensure the encoder can see the camera feed and the software is ready to stream. This offline test prevents headaches later when you’re out in the field.
3. Install and Connect the Modems/Hotspots:
- Insert SIMs: Take your SIM cards and insert them into the respective devices (USB dongles, hotspot devices, or phones). Make sure each modem device is activated and has an active data plan. It’s easier to do initial SIM setup (like entering PIN codes or APN configurations) at home. For example, some unlocked USB modems require setting the APN (access point name) for your carrier via a web interface or modem utility. Do that now so that the modem knows how to connect to the network.
- Connect to Encoder Device: For USB dongles or tether phones, plug them into the encoder (Pi) via USB cable. The Raspberry Pi should provide power and detect new network interfaces. For tethered smartphones, enable “USB Tethering” in the phone’s settings once plugged in; the phone should then share its mobile data connection with the Pi. If using a dedicated hotspot device that doesn’t tether via USB, you can connect it to the Pi via WiFi (set the Pi to connect to the hotspot’s WiFi network). However, using USB or Ethernet is preferable for stability if possible. Connect one connection at a time and verify the encoder sees internet from it – e.g., on the Pi, check if it got an IP address and can ping out via that interface. Then connect the second one and check similarly.
- Bond Connections (Software Setup): Launch your bonding software (Speedify or similar) on the encoder. In Speedify, you should see multiple connections listed (each modem, tether or WiFi). The software will automatically combine them. If using another solution like a bonding router or BELABOX, follow its instructions to bond – BELABOX for example will use all available connections and send video via a custom protocol to its cloud server. At this stage, ensure that bonding is active and that you have internet access through the bonded link. An easy test is to run a speed test or just try loading a webpage from the encoder (if it has a browser or via command line). If you see your traffic using both connections (some bonding apps show a status with each connection’s usage), you’ve set it up correctly.
4. Power Up and Wiring the System:
- Place and Connect the Battery: Put your high-capacity battery pack into the backpack, ideally in a sleeve or compartment where it’s secure. Connect the power cables from the battery to the devices: one cable to power the encoder (e.g., USB-C into the Pi or Jetson), another cable could go to your camera if you plan to power it externally, and possibly additional cables to charge tethered phones or hotspots. Use the multiple outputs of the battery as needed (or use a small USB hub if you only have one output, though most big packs have at least two). Make sure each device shows it’s receiving power (lights on the Pi, camera charging indicator, etc.). Tip: If your camera has an internal battery, it might be wise to start with it fully charged; then the external battery will keep it topped up. Some streamers remove the internal battery from action cams to reduce heat, in which case the external power must be continuous. For now, ensure the battery pack itself is fully charged (100%) before you head out streaming.
- Cable Routing: Now that everything is plugged in, route the cables neatly. Run the HDMI cable from the camera on your strap into the top of the backpack, leaving a bit of slack so you can move freely but not so much that it dangles. You can run it along the inside of the shoulder strap or use clips/velcro to secure it along the strap to the bag entry point. USB power cables from the camera or phones can follow the same path. Inside the bag, bundle excess cable length with velcro ties. Try to keep data cables (HDMI, USB) separate from any audio cables to reduce interference (not usually an issue, but good practice). Also, avoid sharp bends in cables to prevent wear. Essentially, create a clean layout where if you open the backpack, you see organized devices with minimal tangles. Labeling the cables (with a small tag or color code) can help you quickly identify which cable is for which device when troubleshooting.
- Secure the Devices: With cables routed, secure each device in place. Use the organizer panel or velcro straps to hold the Raspberry Pi/Jetson in one spot so it’s not bouncing. Do the same for the capture card (if it’s a dongle, maybe velcro it next to the Pi), and for the USB modems or phone tether – they could go in a mesh pocket or be strapped down. Ensure the battery is snug; some people actually use velcro tape to stick the battery to the inside wall of the backpack to keep it from shifting. Remember to allow some breathing room around devices that generate heat (the Pi and modems may get warm). If you have a small USB fan or the Pi’s case fan, position them such that they can circulate air. Double-check that nothing will easily come unplugged if the bag is jostled – you might use a bit of tape or a velcro wrap at connectors to keep them together (for example, tape the HDMI connector at the capture card so it can’t slip out).
5. Initial Power-On Test:
- Now for the exciting part – testing the assembled system. Turn on or power up each component. For the Raspberry Pi or Jetson, it will boot as soon as it’s plugged into the battery (some battery packs have a power button you may need to press to start supplying power). Turn on the camera and start outputting (some action cams start outputting HDMI as soon as they’re on and plugged in). Turn on any hotspots or tethered phones. You should see indicator lights: the encoder board’s LEDs, the capture card if it has any, modems often have connectivity LEDs.
- Check Video Feed: Access your encoder’s interface (if headless, maybe you remote in via laptop or use a phone VNC/SSH, or connect a tiny preview screen if you have one). Verify that the video from the camera is being captured. In OBS, you’d see the camera view in the preview; in command-line, perhaps you can record a few seconds of footage to ensure it’s capturing. If using a phone as the camera/encoder, open the app and ensure it shows your camera image. This is crucial: we need to confirm the camera is properly connected through the capture card to the stream. If there’s no feed, double-check the HDMI connection and that the capture card is recognized. Sometimes re-plugging the capture card or a quick reboot solves an initial quirk.
- Check Internet Connection: Also confirm that your bonded internet is working on the encoder. Try a speed test or start the stream at a very low bitrate to see if it connects. You can also check each modem: does each show an active connection (maybe lights or via software status)? If one is not connecting, troubleshoot now (perhaps an APN issue or weak signal indoors). It’s better to iron out connectivity issues before you’re outside.
- Stream a Test (Locally or Unlisted): As a final assembly test, attempt a short livestream from your backpack in a private or unlisted mode. For example, stream to a test channel or use the “record” function instead of going live, just to see if the system can handle continuous encoding. This test will also let you gauge CPU usage and temperature on the encoder. On a Pi, check that it’s not overheating (the Pi 4 will thermal throttle if it gets too hot – consider a heatsink/fan which we already have in our case). Listen to the audio in this test (maybe plug headphones into another device watching the stream) to ensure the mic is working well.
If everything in the assembly test checks out – congratulations! You have a functioning IRL backpack system. Now, let’s dive deeper into some of the important considerations that will make your streaming experience top-notch, starting with how we use those multiple internet connections to keep your stream stable.
Multi-SIM Bonding for Reliable Streaming
One of the standout features of a good IRL backpack is channel bonding – combining multiple cellular connections to act as one robust internet source for your stream. Let’s explain what this is and how to set it up and use it effectively in our budget build.
What is Channel Bonding?
Channel bonding (or multi-SIM bonding) means using two or more internet connections at the same time and merging them into one “pipe” for your live stream data. In practice, your video stream is split across the connections: for example, some data packets go out over Carrier A, others over Carrier B. On the receiving end (usually a server in the cloud), those packets are recombined into the full stream and forwarded to the streaming platform. The result is higher available bandwidth and redundancy – if one connection slows down or drops momentarily, the other connection(s) can compensate so your viewers don’t see a buffering wheel or disconnect.
Why Bonding is Useful:
- Higher Bitrate: By having multiple networks, you can push a higher bitrate than a single network might allow. For instance, if each of two networks can sustain ~3 Mbps upload individually in a certain area, bonding might allow a 6 Mbps stream, enabling higher resolution or frame rate. This is great for keeping 1080p streams looking crisp.
- Failover and Stability: If one SIM loses signal (perhaps you walk into a dead zone for Carrier A), the other SIM still maintains the connection, which can prevent the stream from dropping entirely. Viewers experience fewer hiccups. Bonding software often dynamically adjusts, so even if one link gets weak, it will send more data on the stronger link until the weak one recovers.
- Lower Latency Variance: Bonding solutions can also help smooth out latency spikes. They might send duplicate small packets on both links (some advanced bonding techniques do this) so that whichever gets through first is used, thereby reducing the chance of a single delayed packet stalling the stream. This is more relevant in professional gear, but even basic bonding improves overall reliability.
How to Set Up Bonding (Software):
In our build, we’ve either installed a bonding VPN service like Speedify on the Raspberry Pi, or we’re using a specialized solution like BELABOX on a Jetson. Let’s outline the general approach with Speedify, since it’s beginner-friendly:
- Speedify: This is an app/service that handles the bonding for you. On the Raspberry Pi (or a laptop or even a smartphone), Speedify will detect all available internet connections. You simply log in and toggle it on, and it will create a bonded VPN tunnel. All your streaming data will go through this tunnel to Speedify’s cloud servers, which then output to your streaming destination. The advantage is you don’t need to set up your own server or complex networking; Speedify takes care of merging and splitting the streams. It is a paid service (with monthly or annual plans), but quite reasonable in cost for the reliability it adds. Once running, you’ll see each connection’s usage and you can even prioritize one if you have a limited data cap on another, etc. For a beginner build, Speedify is straightforward – just ensure it’s set to start automatically on boot and connect, so you don’t have to manually trigger it every time.
- BELABOX (or Custom SRT Bonding): If you went the Jetson Nano route with BELABOX software, bonding is built-in via an efficient protocol (SRT and SRTLA) and a cloud relay (which might cost a small subscription or you can self-host if experienced). BELABOX essentially acts like a do-it-yourself LiveU: it will bond multiple connections and send the video feed to a relay server that you set up (or a service they provide), and from there you can get it into OBS or directly to your streaming platform. The setup for BELABOX is more advanced, but they provide images and instructions. The concept is similar to Speedify in that multiple connections are used together to provide one reliable stream output.
- Other Methods: There are hardware bonding routers (Pepwave, Mushroom Networks, etc.) which can combine SIMs at the router level. Those are pricey and usually beyond our budget, but if one had a device like that, you’d simply plug your encoder into that router and it handles the bonding. Since our focus is budget, we stick with software bonding which leverages the power of our mini-PC.
Using Bonded Connections Wisely:
- Keep an eye on your data usage on each SIM. Bonding doesn’t magically reduce data usage; if anything, you might use more data because you’re often sending extra overhead or duplicate info. Each connection will consume roughly the full bitrate of the stream (so a 5 Mbps stream uses 5 Mbps on each active connection, in many bonding setups). This ensures redundancy but also means two SIMs both eat data simultaneously. Plan your data plans accordingly (e.g., if streaming a lot, you might need truly unlimited plans on both, or carefully balanced usage). Some bonding solutions allow you to set one connection as primary and only use the second as failover or when needed, to conserve data – that’s an option if one plan is limited.
- Test the bonded setup in various environments. For example, you may find Carrier A works great in the city but Carrier B is better in rural areas. With bonding, you’ll generally be covered in both, but understanding your carriers’ strengths can help you decide which SIM to prioritize if needed.
- Consider latency: Bonding can introduce a bit of extra latency (because data goes through a cloud server). This usually isn’t a big concern for IRL streams since a few hundred milliseconds delay is fine. But just be aware that your chat might be a second or two further behind real-time due to the bonding process. It’s a small trade-off for not dropping the stream.
- Troubleshooting bonding issues: If you notice your bonded connection isn’t performing well (e.g., you’re still getting stutters), check if one of the connections is dragging down the overall speed. Sometimes one SIM might have extremely poor signal and effectively choke things. In such cases, bonding can only do so much. You might temporarily disable the bad connection (Speedify lets you toggle connections on/off) until you move to a better area. Also ensure no single connection is saturating its bandwidth in both directions – for example, avoid heavy downloads or background updates on the encoder which could consume bandwidth. Dedicate the connections to the stream for best results.
In summary, multi-SIM bonding is our secret weapon for reliable high-bitrate streaming. By setting up two or more cellular links and combining them, we greatly reduce the chance of losing our stream due to network issues. It’s one of the key advantages our DIY backpack will have over someone trying to stream on a single phone connection. With bonding set up, you can roam farther and with more confidence that your broadcast will stay live.
Next, we’ll focus on how to ensure the video and audio quality of that broadcast are as good as they can be, and how to manage the practical issues like heat and battery life during those long streaming sessions.
Maximizing Video and Audio Quality
Now that the hardware is assembled and connectivity is sorted, let’s talk about getting the best possible video and audio out of your setup. Good quality content keeps viewers engaged and makes your stream look professional. Here are some tips and considerations for video and sound quality in an IRL backpack context:
Video Quality Tips:
- Resolution & Frame Rate: Balance these settings based on your equipment and network. 1080p at 60fps provides very smooth, high-detail video but requires a lot of bandwidth (and more processing power). 720p at 30fps uses much less data and might be more stable in low-signal areas, though it’s not as sharp or smooth. For our budget setup, a safe starting point is 720p60 or 1080p30. These offer a good compromise of quality and reliability. You can always experiment and increase to 1080p60 if your bonding and hardware allow, or drop to 720p30 if you need to conserve data. The key is consistent quality without buffering, rather than simply high resolution.
- Bitrate: This goes hand-in-hand with resolution. For 720p, a bitrate around 3000-5000 Kbps is typically sufficient for clear image quality. For 1080p, 5000-6000 Kbps (or even up to 8000 if the platform allows and you have the bandwidth) will look nice and crisp. Set your streaming software to use a fixed bitrate or a rate that adapts slightly. If using a service like Twitch, note that non-partnered channels may have limitations on viewers’ ability to downscale, so streaming above 6000 Kbps might affect some viewers. It’s usually better to stay around 6000 Kbps max for accessibility. Monitor your stream health and if you see any instability, don’t hesitate to lower the bitrate a bit. Smooth video with no interruptions is preferable to occasionally choppy higher-quality video.
- Encoder Settings: If using a Raspberry Pi or Jetson, take advantage of hardware encoding (H.264). This offloads video compression to the GPU hardware, which is much more efficient and will keep your CPU usage and temperature lower. For example, on a Pi with FFmpeg, you’d use h264_omx (OpenMAX) or on a Jetson use NVENC if available. Hardware encoders might have slightly lower quality than software x264 encoding at the same bitrate, but the difference is minor for live streaming and the reliability gained is worth it. If using a smartphone, the app will automatically use the phone’s hardware encoder.
- Lighting and Camera Settings: IRL streamers often face changing lighting (outdoor sun, shade, indoor low light). While you can’t control the sun, you can optimize your camera. If your camera has a protune or manual exposure mode (GoPro has Protune, for instance), you might set a maximum ISO to limit noise in low light, or lock exposure in certain cases. However, for simplicity, leaving the camera on auto settings usually works fine; just ensure it’s set to a wide or linear field of view as you prefer. In very dim conditions, consider adding a small light – but that adds complexity and weight, so most just deal with low-light grain or avoid streaming in darkness.
- Stabilization: We chose an action cam partly for its stabilization. Use it! Electronic or optical stabilization will smooth out bumps as you move. This makes a huge difference in watchability. If using a phone, many have built-in stabilization; additionally, holding it on a gimbal or even a simple stabilizing grip can reduce shake. Test walking and running with your setup to see how the video looks. If it’s too shaky, adjust the mount or consider a different mounting method (chest mount tends to stabilize via your body’s natural damping, whereas a loose hand could introduce more shake). You want the viewers to feel like they’re along for the ride comfortably, not on a very bumpy journey.
Audio Quality Tips:
- Use the External Mic: If you invested in a lapel mic or external microphone, make sure to use it correctly. Place a lavalier mic high on your chest, centered, or slightly towards the side of your mouth. A good spot is near the collar of your shirt. This position picks up your voice clearly even if you turn your head, and it’s closer to your mouth than a camera-mounted mic would be. For a shotgun mic on the camera, aim it towards you (if you’re doing a lot of talking) or towards the forward scene if you mostly narrate behind the camera. Remember, action cams often don’t have great mics, so relying on the external one is key.
- Monitor Audio Levels: During your tests, check the audio levels in your streaming software. Ensure you’re not peaking (distorting) when you speak loudly or there’s sudden noise. Aim for a healthy level where normal talking sits around -10 to -5 dB on the meter, giving headroom for louder sounds. OBS or other software will show an audio meter. If you see it hitting the red zone frequently, lower the input gain. Conversely, if viewers say your audio is too quiet, you might boost it a bit or move the mic closer.
- Ambient Noise and Directionality: IRL streams often have background noise (traffic, crowds, wind). A good mic choice helps – a lapel mic picks up your voice well and somewhat ignores distant noise, but it can still catch loud sounds around you. A directional (shotgun) mic will pick up mostly where it’s pointed. If you are in a noisy place, you might need to speak a bit louder or even pause commentary if, say, a loud motorcycle passes by (so as not to shout over it). Over time, you’ll get a feel for how much ambient sound is tolerable. Some ambient noise is actually nice for viewers (it gives a sense of presence), so you don’t need total silence, just clarity when you are speaking.
- Wind Noise: As mentioned, wind can be disastrous to audio. Always use the windscreen on your mic when outdoors. If it’s very windy, try to position your body or the camera such that the mic is shielded from direct wind (for example, behind you or behind a foam). If a sudden gust comes, you may hear some rumble; you can reduce this by enabling any wind reduction filter your mic or camera has (some cameras have a “wind filter” setting that cuts low frequencies, but that can also affect voice quality, so test it). In post or advanced software, a high-pass filter can remove rumble – but since we stream live, better to prevent it at the source with physical wind protection.
- Interference: If using wireless microphones, be mindful of interference and battery life. Always start your stream with the wireless mic fully charged (transmitter and receiver). Keep the receiver a reasonable distance from the transmitter (on your body, that’s usually fine, but don’t put the receiver buried in a foil-lined pouch or something – it needs clear RF signal). If you ever hear crackling or drops in audio, it could be wireless interference – try changing the channel on the wireless kit if possible or repositioning it. As a backup, some streamers carry a cheap wired clip-on mic that they can plug in if the wireless fails mid-stream. It’s not as convenient, but it can save the day for audio.
Quality vs. Performance:
Remember that streaming outdoors is a dynamic challenge. You might have to dial back quality on the fly if conditions demand. For example, on a congested cell network (maybe at a big event with many people), your bonded connection might struggle to hit high bitrates. In those moments, it’s okay to temporarily lower your stream quality (many streaming apps allow you to change bitrate or resolution on reconnect). The key is to maintain a smooth, uninterrupted stream, even if it means dropping to 480p for a bit. Communicate with your viewers if needed – most will understand and appreciate a continuous stream over a high-res slideshow. The beauty of a multi-part setup is that you do have knobs to turn – you can adjust encoding settings, which is harder to do on a simple phone-only stream. Use that flexibility to adapt as you go.
By following these video and audio tips, your stream will look and sound great. At this point, you have assembled your gear and optimized the output quality. Next, we need to consider the practical aspects of keeping this gear running: managing heat buildup and ensuring your battery lasts as long as you need.

Managing Heat and Battery Life
Continuous live streaming is demanding on hardware. Devices can get hot and batteries will drain steadily. If not managed well, overheating can cause shutdowns and a depleted battery will obviously end your stream abruptly. Let’s address how to keep your system cool and powered up for the long haul.
Heat Management:
- Ventilation in the Backpack: Electronics like the Raspberry Pi, Jetson, modems, and even batteries can generate heat. If all packed tightly, heat can accumulate. To combat this, ensure there’s some airflow. We already added a small fan in the Pi’s case – that’s great for cooling the Pi’s CPU. Additionally, try to pack the devices in such a way that air can circulate around them. For instance, don’t wrap the Pi and modems in a cloth that traps heat; instead, allow a small gap or use that mesh pocket so at least one side is exposed to air. If your backpack has ventilation eyelets or if you’re DIY-inclined, you could even cut a discreet hole or mesh section to let hot air escape. Some streamers leave their backpack unzipped a tiny bit at the top for ventilation (just be cautious of weather or things falling out; only do this if it’s safe).
- Positioning Hot Devices: Consider putting the heat-generating devices away from direct contact with your back. For example, place the battery (which can warm up when supplying lots of current) lower in the bag and the Pi towards the middle or outward side. Many backpacks have multiple compartments – you might put the main heat sources in the outer compartment, not the one pressed against your back. This not only keeps you cooler but also gives those devices a bit more breathing room.
- Monitor Temperatures: During your test streams, keep an eye on device temperatures if possible. The Raspberry Pi has a built-in temperature sensor; you can log it or have it display a warning if it crosses a threshold (around 80°C the Pi will throttle). If you see high temps, consider additional cooling: maybe a second small fan in the bag, or those little USB-powered laptop coolers. Even a simple solution like taking a short break, opening the bag and fanning some air in, can help if you suspect overheating. On very hot days, try to stay in shade and avoid direct sun on the backpack – sunlight can dramatically heat up the bag and everything inside.
- Camera/Phone Overheating: Don’t forget the camera or phone itself can overheat, especially in warm weather. GoPros, for instance, can run hot when charging and filming simultaneously. To mitigate this, you can remove the internal battery from the GoPro and run it solely on external power (which reduces heat generation). Many IRL backpack users do this – it prevents the GoPro battery from swelling or overheating over long streams. If using a smartphone, things to avoid: don’t put the phone in a waterproof case or fully enclosed mount (that traps heat), and lower the screen brightness if you’re not needing to look at the screen (or turn the screen off if possible during streaming to save heat and battery). Also, close any background apps – the phone should focus resources on streaming only. If your phone tends to overheat, you might point a small fan at it too, or periodically give it a rest in front of an AC vent or cool spot if indoors.
Battery Life and Power Management:
- Know Your Power Draw: It’s useful to estimate how long your battery will last given your setup’s power draw. For example, if your whole rig draws about 10 Watts on average (a Raspberry Pi ~5W, each modem maybe 2W, camera ~2W while charging and on), and you have a 100 Wh battery, in theory that’s 10 hours (100 Wh / 10 W = 10h). In practice, due to inefficiencies and fluctuating usage, you might get perhaps 6-8 hours from a 20,000 mAh pack. Do a dry-run test: run the system on battery and see how much percent drops per hour, or how many hours you get. This way you won’t be caught off guard live.
- Extending Runtime: If you find that your current battery gives, say, 4 hours but you want 6, you have a few options. One is to simply add a second battery pack to your kit and swap when the first is empty. Another is to reduce power consumption: turn off one of the modems if you are in a strong coverage area (bonding might not be strictly needed if one connection is doing fine – you can temporarily disable one to save power and data, then enable it when needed). Also, dim or turn off indicator LEDs on devices if possible (some DIYers put tape over bright LEDs mainly for stealth, but it has a negligible effect on power – still, anything not needed can be off). The Pi can also have power saved by turning off HDMI output (if no monitor) and other tricks, but those get technical. Generally, carrying enough battery capacity is the simpler solution.
- Hot Swapping Batteries: We touched on this, but to elaborate: if you need to swap battery packs during a stream without cutting power, one trick is to use two batteries and a diode OR-ing cable or a UPS hat for the Pi. However, that can be complex for a beginner. A more manual approach is to start charging the second power bank from the first (if the first supports output while charging another – some do, effectively daisy-chaining, though not all allow this). Alternatively, plan a brief intermission: maybe you have a BRB (be right back) screen you can switch to on your stream (some IRL streamers use a simple image or screen from their phone when they need to pause). During that break, you could quickly shut down the Pi (or let the stream run on one modem like a phone temporarily) and swap batteries, then reboot and resume. It might cause a minute or two of downtime, but that’s better than an unplanned drop when the battery dies unexpectedly. With experience, you’ll figure out the safest way to manage this. If possible, always start your stream with everything fully charged – that way you maximize time before any swap is needed.
- Charging on the Go: If you plan to be out for very long sessions (8+ hours), consider carrying additional power options. Some people bring a smaller spare power bank specifically to charge the main devices while offline (like to recharge a GoPro battery or phone during breaks). If you’ll be near a vehicle or cafe, having a wall charger or car charger to top up one pack while using another can extend your total day. There are even solar panel attachments for backpacks – though realistically, solar charging is slow and not very useful for heavy draw devices, it’s more of a trickle emergency charge. In our budget, investing in one more battery is usually more effective than solar panels.
- Backup Power Plan: Think through a scenario: what if your battery unexpectedly dies mid-stream (maybe it didn’t charge fully, or devices drew more power than estimated)? It’s good to have a plan: that could simply be “the stream will go offline and I’ll swap battery and explain to chat when I’m back,” or perhaps keep a minimal setup running – for example, your phone alone could keep streaming on its internal battery if everything else fails. One approach is to quickly enable streaming from the phone (using its own 4G) if the backpack power fails. It won’t be bonded or have the same quality, but at least you keep the broadcast going. Communicate to the audience if that happens, they’re generally understanding of technical issues in IRL streaming.
By actively managing heat and power, you ensure that your carefully built backpack continues to perform throughout your adventures. Overheating and battery drain are the two main culprits of technical failure in mobile streams, but with the precautions above, you’ll minimize those risks.
Next, we’ll address how to literally wear and carry this backpack in the most comfortable way possible, and then how to test and troubleshoot everything so you’re fully prepared.
Optimizing Comfort and Weight Distribution
Even the best streaming rig can be a burden if it’s uncomfortable to wear. Since you’ll potentially be walking for hours with this backpack, let’s focus on making it as comfortable and ergonomic as we can. A comfortable setup will let you stream longer and with less fatigue, which means a better experience for you and your viewers.
Backpack Fit and Adjustment:
- Once your gear is loaded, put on the backpack and adjust all the straps to fit you snugly. The shoulder straps should be well-padded and sit flush on your shoulders without a gap. Use the chest (sternum) strap to pull the shoulder straps together slightly; this prevents them from sliding off and helps distribute weight across your chest. Adjust the height of the chest strap so it’s roughly mid-chest, not up by your throat. If your backpack has a waist (hip) belt, definitely use it. Tighten it around your hips (not your belly) so that it takes some weight off your shoulders. A good hip belt can transfer a significant portion of the load to your legs (which are stronger and more fatigue-resistant than shoulders). Even a light backpack benefits from this because it reduces the constant shoulder strain. If the pack lacks a hip belt, you can buy add-on waist straps or choose a different pack if that’s a major concern. For a sub-10 lb load it’s not critical, but for anything heavier, it helps a lot.
- Weight Distribution Inside: As mentioned earlier, place the heaviest items close to your back and low in the bag. For us, the heaviest single item is likely the battery pack. It should go in the part of the backpack that touches your back, near the bottom. This positioning keeps the center of gravity lower and closer to your body, which makes balancing easier and reduces strain. Lighter items (like cables, capture card, even the Pi which is light) can sit on top or further out. Also try to balance left-right: you wouldn’t, for example, put a heavy battery on the far right side of the bag and nothing on the left. If using side pockets or pouches, distribute weight evenly. The backpack should not lean or pull to one side when worn. A quick test: put on the fully loaded bag and see if you can stand naturally without feeling like you have to lean forward or sideways. If you find yourself leaning, re-adjust the packing or the straps.
- Padding and Pressure Points: Check if any part of the gear inside is poking or creating a pressure point on your back. Sometimes a corner of a hard case or a knot of cables can create a bump that you’ll feel after an hour of walking. You can add extra padding inside the backpack in strategic places. For instance, using a piece of foam or a folded soft cloth around hard objects. Some backpacks have removable back pads or you can insert a piece of foam cut to shape. Make sure the fan vents of devices aren’t completely smothered by foam though – leave breathing room. Another trick: use your spare clothing or a small towel not only for its intended use but also as padding around gear. Comfort and gear safety align here – padding protects devices from shock and your back from discomfort.
- Airflow and Heat against Back: Many hiking and camera backpacks advertise “ventilated back panel” designs – such as raised mesh that keeps the pack slightly off your back to allow airflow. If you happen to have a pack like that, great; if not, you can still encourage airflow. One way is to not pack the bag completely tight; leave a little space at the top or sides where air can circulate. When you take breaks, lift the bag off your back to let some cool air in. You could even consider a thin sheet of breathable mesh or using those bead seat covers (cut down) – but that’s probably overkill. The main heat sources inside (Pi, etc.) we already placed away from the back panel if possible. So the remaining warmth will be mostly your own body heat and maybe the battery’s warmth. If you’re streaming in hot weather, take short breaks, stay hydrated, and try to stream during cooler parts of the day if possible. There’s a reason a lot of IRL streamers wear caps and keep water handy – being comfortable yourself is part of the equation!
Cable and Gear Management for Mobility:
- Ensure that any cable coming out of the backpack (to your camera or mic) has enough slack for your movements but not so much that it snags. For example, if the camera is on a strap mount, leave a little loop of slack cable near the camera so when you turn your body or move the camera slightly, it’s not tugging instantly. That slack loop can be secured to the strap with a velcro tie so it doesn’t dangle – it’s just a small service loop. The rest of the cable is then routed firmly down to the bag.
- If you have a microphone wire running to a lapel mic, do similarly: run it inside your clothing or along the strap so that you won’t accidentally yank it. Wireless mics avoid this issue, which is nice.
- The goal is that as you move, bend, twist, or even take the backpack off, you won’t accidentally jerk any connections. Quick tip: Before heading out, practice removing the backpack without disconnecting anything. For instance, if you need to take it off for a moment, perhaps you should stop the stream or hold the camera in your hand (so it doesn’t yank off as you lift the bag). Unclip your mic or camera mount if needed before fully removing the bag, until you develop a smooth technique. This prevents sudden strain on ports that could cause wear or disconnections.
Overall Weight and Endurance:
- Try to keep the overall weight of your backpack manageable. Our budget build might weigh around 5 to 7 lbs (roughly 2.5 to 3 kg) including battery, devices, and bag. That’s not too bad, but after several hours it will feel heavier. If you find the weight is causing shoulder pain, consider trimming any unnecessary items (do you really need that second huge battery for a short stream? maybe carry one and a smaller backup instead of two big ones). Alternatively, do some adjustments: loosen the shoulder straps for a minute and shake out your shoulders, then tighten again – a quick relief trick. Use that waist belt to its fullest to take weight off shoulders during long stretches.
- Footwear and posture matter too: wear comfortable shoes if you’ll be walking a lot, and stand up straight rather than hunching forward, which a heavy backpack might tempt you to do. A well-fitted pack should allow an upright posture.
- If you plan extremely long IRL sessions, you might incorporate short breaks intentionally. Set the backpack down, stretch, maybe even carry it by hand for a minute instead of on back (but be careful not to cover vents if running). These breaks not only help you physically but also give the gear a moment to cool as airflow changes.
By giving due attention to comfort and ergonomics, your IRL backpack will feel like a natural extension of you rather than a clunky appendage. This means you can focus on your content and interactions, not on a sore back. Many beginner streamers overlook this aspect and end up exhausted or in pain, cutting streams short – but you’re planning ahead to avoid that, which is great.
With gear in place and comfort optimized, the last steps are making sure everything is tested and knowing how to troubleshoot issues that might arise. Let’s cover testing and on-the-go maintenance next.
Testing Your Setup Before Going Live
Before you embark on a real livestream in the wild, it’s crucial to thoroughly test your entire setup in a safe and controlled environment. A bit of preparation can save you from embarrassing technical difficulties in front of an audience. Here’s a checklist of testing and troubleshooting steps to do before your first official IRL stream (and as needed whenever you change something in your setup):
1. Dry-Run at Home:
Choose a location at home (or even just outside your home) where you can simulate a streaming session. Set up all the gear as if you were live: put on the backpack, mount the camera, connect to your bonding service, etc. Start a stream, but set it to private/unlisted or stream to a test channel (some platforms allow a test mode or simply make a throwaway account for testing). This way, you can see exactly how the stream performs without any real viewers. Walk around your house or yard to mimic movement. Test for at least 15-30 minutes to see if any problems crop up over time (some issues like overheating or slow data speeds might only appear after a bit of continuous use). While testing, monitor the stream on another device (like watch your own stream on a second phone or computer) to check the quality and stability. Take notes of any issues (e.g., “audio is crackly when I turn my head” or “video stuttered at 10 min mark”) so you can address them.
2. Connectivity and Signal Check:
During your test, pay attention to the connection indicators. If using Speedify, see if it’s ever reporting disconnects on one connection, or if the overall bandwidth is fluctuating widely. Try moving to different spots in your area – maybe step outside and walk down the street. Does one SIM drop out? If so, you might need to adjust antenna orientation (for USB modems, sometimes angling them differently helps) or check if that SIM has an issue. Test each connection individually too: turn off bonding temporarily and stream using only SIM A, then only SIM B. This can reveal if one connection is significantly weaker or has higher latency. If one network is consistently poor, you might consider a different carrier or ensuring that modem is configured correctly. It’s better to find out now than mid-stream.
3. Audio Testing:
Listen to your test recordings or live test stream focusing on audio. Can you hear your voice clearly? Is there background hum or hiss? Sometimes ground loops can cause noise when devices are connected to the same battery – if you hear a hum, a ground loop isolator might be needed on the audio line (this is rare for simple setups, more common when using external audio mixers, but keep it in mind). Check sync between audio and video – if you notice audio lagging or leading video, you may need to add a sync offset in the software. Wireless mic users: test range by walking a bit away (though the mic stays on you, maybe test by turning around, seeing if any obstruction causes dropout). Also test how it handles loud noises – maybe clap or speak loudly to see if it peaks. Adjust mic gain or position accordingly. It’s easier to tweak these things when you’re not live to an audience.
4. Long Duration Test:
Do a longer test stream when possible, perhaps an hour or two, simulating a real outing. This will test battery life and thermal performance. Keep an eye on the encoder’s temperature (some software can log it; or just feel the bag to see if it’s getting very hot). If the Pi has a throttling issue it might manifest after a while (maybe your video frame rate drops or it disconnects). Better to catch that now. Also see how much battery percentage was used in, say, one hour, to extrapolate total runtime. If you only used 20% in one hour, theoretically 5 hours total – but if you used 50% in one hour, you know you need more capacity or lower power usage. Additionally, a long test might reveal memory leaks or software issues (if, for example, OBS crashed after 45 minutes due to some error, you’d want to fix that or update the software before a real stream).
5. Field Test in a Low-Stakes Situation:
After home testing, do a real-world test in a low-pressure environment. This could be a short unannounced stream or a recording while you walk around your block or visit a park. The idea is to test mobility, handoffs between cell towers, etc. See how the stream holds up as you move further from your home WiFi and rely fully on cellular. If possible, bring a friend or use a second device to monitor the live feed and message you if something’s off. Note how the backpack feels after 30 minutes of walking – any new rattling sounds or discomfort? Adjust as needed (maybe add another cable tie or pad a sharp edge you discovered).
6. Troubleshooting Common Issues:
It’s almost certain you’ll encounter some hiccups. Here are common ones and how to address them:
- Stream disconnects or buffers frequently: This usually points to a network issue. Check if one of the modems lost connection – you might find one of your SIMs has poor coverage where you are. Bonding should handle some of that, but if both are weak, you may need to lower bitrate or find a better signal (move to a higher spot or less obstructed area). As a quick fix, you can stop and restart the stream at a lower resolution if needed. In the long run, consider adding a third connection or an external antenna to your modem if this is frequent.
- Video feed freezes: If the video from your camera freezes, the capture card or camera connection might have an issue. Check the HDMI cable – is it firmly in place? Sometimes cables can wiggle out as you move. Ensure it’s secure (using tape on the connection can help). Also consider the possibility of the capture device glitching – unplugging and replugging it might refresh it (though that’s not ideal mid-stream). Using a higher quality capture card can reduce this risk, but our budget one should be okay if connections are tight. Another cause could be the camera overheating and shutting off – if your camera stops outputting, that’s a serious problem to avoid by managing heat.
- Audio drops or static: If you lose audio, first check if your mic battery died (for wireless). That’s why monitoring battery or having spares is key. If static noise appears, it could be a loose connection in the mic cable – try repositioning or replugging the mic connector. In a pinch, switching to the camera’s internal mic (if your external fails) is better than nothing; you could do that by unplugging the external mic, and the camera/phone will default to its internal mic. It won’t sound as good, but at least your viewers can hear you.
- Overheating alerts or shutdown: If a device actually overheats and stops, you’ll need to cool it down. The Pi might reboot or throttle – you could quickly cool it by powering down and letting air in. To avoid getting to that point, perhaps you need more cooling (like an extra fan or more venting). For cameras or phones overheating, sometimes reducing workload (e.g., lower brightness on phone, or take the camera out of direct sun) can help. On stream, if you foresee overheating, you might take a quick break in a shaded area to let things cool while chatting with viewers on another device or just showing a holding screen. It’s better than pushing until a shutdown happens unexpectedly.
7. Have a Pre-Stream Checklist:
Pilots use checklists before takeoff – you can do the same for your IRL backpack. Before you go live each time, run through a quick checklist such as:
- All devices charged (battery pack full, camera charged, mic charged, phones charged).
- SIM cards in place and have data (and you’ve paid your phone bill!).
- Cables firmly connected.
- Start bonding software and ensure connections are active.
- Start streaming software and verify video+audio preview looks good.
- Mic attached properly and audio levels good.
- Backpack zippers closed or equipment secured (double-check nothing will fall out).
- Comfort check: straps adjusted, nothing feeling off-balance.
This mental (or written) checklist ensures you don’t forget something simple that could ruin a stream, like leaving with the camera still on standby mode, or forgetting to turn on the mic.
By testing thoroughly and troubleshooting in advance, you build confidence in your setup. You’ll start your actual streams knowing that “hey, I ran this for two hours yesterday just fine, it should go smoothly today.” And if something does go wrong, you’ve likely encountered it during testing and already know how to address it quickly.
Finally, let’s talk about what to do during live sessions to keep everything running smoothly – maintenance, monitoring, and quick fixes on the go.

On-the-Go Maintenance and Best Practices During Streams
When you’re live, you become both the content creator and the technician. You have to keep the show going while also keeping an eye on your equipment. Here are best practices for maintaining your IRL backpack system during a live session and handling any issues without panic:
1. Monitoring Your Stream:
It’s a good idea to have a way to monitor your own stream in real time. Many IRL streamers carry a second phone or use the same phone with a split view (though that can be cumbersome). At the very least, periodically check the chat or have an auto-bot that reports “Stream Quality Good” type messages. If you have a second device (like a lightweight phone or even a smartwatch with notifications), you can see if viewers are complaining about buffering or no sound. Some streamers have a trusted mod or friend watch and message them if something is wrong (since reading chat constantly while walking can be dangerous/distracting). Find a system that works for you so that if, say, your camera feed freezes, you know within a minute and can address it, rather than streaming 10 minutes of a frozen frame unknowingly.
2. Battery Management During Stream:
Always start with everything fully charged, and know approximately how long you have before a battery swap is needed. One practice is to set an alarm or timer on your phone for when you expect the battery to hit, say, 20%. For example, if you know you have ~4 hours of battery, set a reminder for 3.5 hours in. This prompts you to start looking for a convenient stopping point to swap or wrap up. Keep an eye on any battery indicators you have: the power bank might have LED bars, your encoder can potentially read its own voltage if programmed, or your phone’s battery if it’s part of the system. Some advanced setups rig a small voltage display in the bag – not necessary but interesting for some. When it’s time to swap battery: alert your viewers that you will pause for a moment (maybe change your stream title to “(Switching battery, be right back)” or just verbally tell them). Then perform the swap swiftly. If your stream goes offline, don’t worry – just get things back up and many viewers will stick around or rejoin when you come back online. If you manage to swap without dropping the stream (for instance, if your camera and modems stayed up on their own internal power just long enough), that’s ideal. Practice makes perfect here, so develop a quick routine to unplug the depleted pack and plug in the fresh one. Also, after swapping, glance at your devices to ensure everything repowered correctly (did the Pi reboot? If so, you need to restart the stream program, etc., unless you had a UPS solution).
3. Overheating on Stream:
On a hot day or long run, you might notice signs of overheating. For instance, if using OBS or similar, the video might start dropping frames, or you might get an alert on the camera/phone. If you feel the backpack and it’s really hot to the touch, proactively take a break. Find a cool spot (indoors or shade), take off the backpack and open it to let air in. You can even carry a small USB fan in your pack; plug it in and let it blow over the devices for a couple minutes. While doing this, you can keep the stream engaged by maybe using your phone camera temporarily (if not already the main) to show something or chat. Explain to viewers that you’re just cooling down the gear – many find the behind-the-scenes aspect interesting too. Once temps are down (which usually happens in a few minutes with airflow), resume normally. It’s better to have a short intermission than a sudden shutdown. Also, take care of yourself in heat – if you’re overheating, the gear probably is too. Stay hydrated, wear lighter clothes, maybe use a cooling towel on your neck. A comfortable streamer will manage equipment better too.
4. Handling Connectivity Drops:
Despite all preparations, you may still encounter areas with poor signal where even bonding struggles. If your stream starts dropping (bitrate plummets or disconnects entirely), try not to panic. Some strategies:
- Keep moving (or stop moving, depending on cause). If you suspect you’re in a dead spot, moving a block over might restore signal. Conversely, if you’re in a highly mobile situation like a train, sometimes staying still might let the modems catch up. Use your judgment – often if signal drops, moving toward an open area (less buildings, higher ground) can help.
- The streaming software often has an auto-reconnect feature – let it do its thing for a minute. If it reconnects, great. If not, you might manually stop and restart the stream (some devices handle a fresh connection better after a fail).
- Have a backup plan such as a single connection fallback. For example, if bonding fails completely, you could turn off Speedify and just use one known-good SIM to try to get at least a low-quality stream out. Communicate with chat via text if possible (like from your phone) that you’re fixing connection issues, so they know you haven’t just disappeared.
- Worst case, if you can’t get back online due to network outage or something, be prepared to wrap it up. Let’s say both networks are out (or the bonding server is down, etc.) – you might have to call the stream. If you still have any connection (like maybe your main phone on a third network), you could go live on that phone briefly to explain the situation or tweet out an update. Most viewers understand that IRL streaming has these uncertainties. It’s okay – with experience, you’ll anticipate areas or conditions to avoid.
5. Quick Fixes and Spares:
It’s wise to carry a few backup items during the stream:
- Spare cables: at least one extra USB cable and maybe an extra HDMI if you have space. Cables are the lifelines and they can fail or get lost. A tiny spare mic (like a cheap wired lapel) in case your main mic dies.
- Portable Tools: A multi-tool or small screwdriver can help if something comes loose. Even a bit of duct tape (wrap some around a pencil or card so you don’t carry a full roll) can be a savior for broken mounts or straps. Zip ties too, for emergency reattachment of something.
- Rain Protection: Weather can change, so have a lightweight rain cover for your backpack (some packs come with one, or use a large plastic bag in a pinch). Also a small ziplock or waterproof pouch that you can quickly pop your camera or phone into if it starts pouring. Water is a danger to electronics, so be ready to shield them quickly or retreat indoors. A sudden rain can also cool things (silver lining?) but do keep everything dry.
- First Aid for Gear: If a device crashes or misbehaves, know the process to reset it. For example, if your GoPro freezes (it can happen), you might have to pull the battery or press a specific reset combo. If the Raspberry Pi locks up, you might need to power cycle it (though that drops stream – but if it’s locked, stream is probably down anyway). Keep these procedures in mind so you’re not scrambling to look them up mid-stream. A paper with some key reset instructions in your bag isn’t a bad idea if your memory blanks under pressure.
6. Engaging While Fixing:
One skill IRL streamers develop is continuing to engage the audience even while troubleshooting. Instead of going silent or looking panicked, narrate what you’re doing (to an extent). For example: “Alright guys, looks like one of my modems got a bit unhappy. I’m just going to switch to my backup connection – bear with me, we might buffer a bit but we’ll be okay.” This keeps viewers in the loop and often they’ll be patient and interested. Some might even give suggestions if they know tech. The key is to stay calm and upbeat; treat tech snafus as part of the journey. Viewers of IRL streams are generally aware that they’re not as perfectly smooth as an in-studio stream. If you handle issues with a good attitude, it actually builds a sort of camaraderie with the audience – you’re all conquering the challenge together.
7. Post-Stream Care:
Once your stream is done, don’t forget to properly shut down and care for your equipment. Turn off or stop the stream in your software before killing power, to avoid file corruption (especially if recording locally). Power down the Pi or Jetson gracefully if possible. Turn off the camera, unplug modems. When you get home, recharge all batteries so you’re ready next time. It’s good to let things dry out if they got moist (open the bag, let any sweat or condensation evaporate). Also reflect on any issues that happened and plan to fix them before next time – maybe you realized you need a better way to mount the mic, or that the battery swap could be faster with a different cable routing. Continuous improvement is part of the process.
By following these best practices during your live sessions, you’ll maintain your stream’s quality and reduce downtime. You’ll also project confidence and professionalism, which makes viewers trust that your channel is worth sticking with even if minor hiccups occur.
Conclusion
Building your own IRL livestreaming backpack might seem complex at first, but as we’ve shown in this comprehensive guide, it’s absolutely achievable for a beginner with some patience and planning. We chose cost-effective components that deliver strong performance, and we assembled them in a way that prioritizes both streaming quality and comfort for long-term use. With a camera (or phone) providing clear video, an encoder device handling the stream and bonding multiple cellular networks for reliability, a beefy battery powering it all, and a comfy backpack to carry it, you now have a blueprint for an affordable IRL setup that rivals professional solutions.
As you put together your backpack and start streaming, remember that it’s okay to iterate and improve as you learn. Each stream might teach you something new about your gear and what you personally need. Maybe you’ll find you want a better microphone, or an extra modem, or a lighter battery – and you can adjust your setup over time. This is the beauty of a DIY backpack: it’s modular and customizable. Plus, you’ll gain a lot of technical skill and confidence from building it yourself.
Most importantly, focus on the content and fun of streaming once the gear is in place. The technology should ultimately “disappear” during your broadcasts, allowing you to be in the moment and interact with your viewers. By following this guide, you’ve minimized the chance of technical problems stealing the show. Now you can strap on your creation and go live to share your world – whether it’s walking through city streets, hiking in nature, attending events, or just chatting on the go.
Happy streaming, and enjoy your IRL adventures with your new backpack! You’ve built something awesome – now go make some memorable live content with it. Good luck and have fun out there!