
IRL Accessories
Essential and Optional Accessories for IRL Streaming (Beyond the Backpack)
Ultimate guide to IRL Accessories! IRL streaming ( “In Real Life” streaming) turns the world into your broadcast studio. Whether you’re exploring busy city streets, hiking through remote wilderness, live-streaming a bustling event, or even cooking in your kitchen, a ready-made IRL streaming backpack gives you a solid start. These all-in-one backpacks typically include basics like a camera, an encoder, a modem (or multiple modems), and a large battery—essentially a mobile live-stream setup on your back. But to truly elevate your stream’s quality, reliability, and versatility, you’ll want to consider additional accessories beyond what comes in the base backpack. This guide will walk you through all the essential extras and some optional (nice-to-have) add-ons that can enhance your IRL streaming experience. It’s written in platform-neutral terms (so it’s just as relevant to Twitch, YouTube Live, Kick, or any other platform) and covers a range of use cases from urban exploration to indoor home streams, crowded events, and off-the-grid outdoor adventures. We’ll also present both professional-grade gear and budget-friendly alternatives for each item, so you can find options that fit your budget and needs.
The accessories below are organized into two main categories—essential items that almost every IRL streamer should have, and optional items that you might pick up to suit specific situations or to make streaming life easier. For each, we’ll explain what it is, why it matters for IRL streaming, and how it improves your stream’s quality or your own comfort. By the end, you should have a clear roadmap for building or upgrading your IRL setup beyond the basic backpack, helping you deliver high-quality streams while staying safe and prepared for anything. Let’s dive in!
Table of Contents

Essential Accessories for IRL Streaming
These are the accessories that nearly every IRL streamer will want to include in their kit to ensure a stable, high-quality stream. Even if you’ve purchased a ready-made IRL backpack, the following items will either replace or augment the default components to better suit real-world streaming conditions.
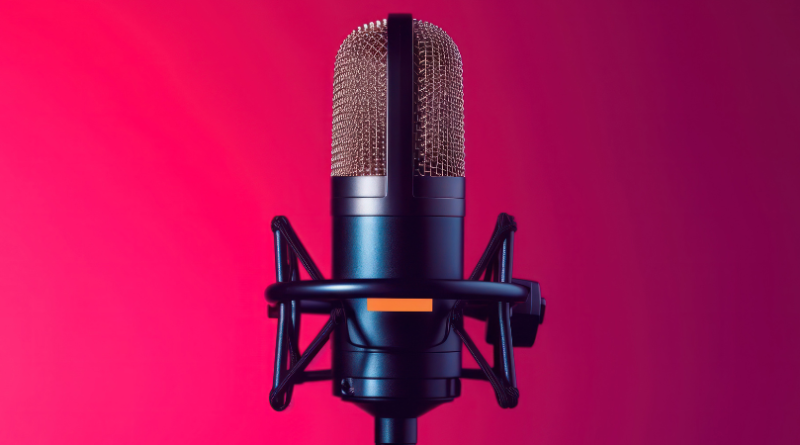
Audio Gear: High-Quality Microphones for Clear Sound
A small wireless lavalier microphone with a windscreen. Good audio is just as important as video for keeping viewers engaged. Unfortunately, the built-in mics on cameras or phones often struggle in noisy, busy environments or can’t adequately capture your voice from a distance. That’s why an external microphone is an essential upgrade for IRL streaming. A dedicated mic helps ensure your audience can hear you clearly over background noise, wind, or echo, whether you’re narrating your walk through a crowded market or chatting with people during a livestreamed event. Improved audio quality makes your stream feel more professional and immersive, and it lets your personality and the ambient atmosphere come through without harsh noise or muffled sound.
What to look for in a microphone: For IRL streaming, you’ll want a compact, durable mic that can handle outdoor conditions and movement. There are two popular styles: lavalier (lapel) microphones that clip to your shirt, or shotgun microphones that mount on your camera/rig. Lav mics are great because they’re close to your mouth and move with you – perfect for walking streams or when you’re on the go. Shotgun mics can pick up sound in front of the camera (including your voice if you’re in front of the lens) and some ambient sound, which can be nice for capturing the environment. Many streamers choose lavaliers for mobility or even use wireless lav mic systems so they aren’t tethered by a cable. For example, a professional-grade option is a wireless microphone kit – these typically include a tiny clip-on mic/transmitter on you and a receiver that feeds into your streaming device. High-end wireless systems (like those from Sennheiser or the Rode Wireless GO series) offer excellent sound quality and range; they minimize dropouts and handle noisy environments well. They can be pricier, but they allow you to move freely (say you set your camera down and walk a few steps away) while your voice remains loud and clear.
If you’re on a budget, a wired lavalier mic is an affordable starting point – you can plug it directly into your camera or phone. Budget lav mics (for example, those under $30 from brands like BOYA or Purple Panda) can still provide a big improvement over built-in mics. The downside is the cable: you’ll need to manage the wire to avoid tangling as you move. Another budget-friendly audio upgrade is a compact shotgun microphone that mounts on your camera or phone (such as a Rode VideoMicro). These small shotgun mics don’t require batteries and significantly improve clarity and directionality of sound, though they work best when you’re relatively close to the camera.
Why it matters: Clear audio makes a huge difference in viewer experience. If you’re streaming in a city, a good mic with a windscreen (wind muffler) will cut down on wind noise and traffic sounds so your voice isn’t drowned out. At crowded events or conventions, a quality microphone will focus on your voice so viewers can still follow what you’re saying amid the background buzz. Even in quieter indoor streams, an external mic placed optimally will avoid the muffled, distant sound that built-in mics can produce. Overall, upgrading your audio gear keeps viewers from constantly adjusting their volume or straining to hear you, and it conveys professionalism. If your stream involves conversations (with chat or with people you meet), interviews, or narration, good audio ensures none of those moments are lost.
Pro tip: Whatever mic you choose, make sure to test your audio and monitor it. Many IRL streamers use a single earbud or headphone to listen to their stream or alerts (more on that in “Communication & Monitoring” below), so they can catch audio issues quickly. Also, always use a windscreen or “dead cat” cover on your mic when outdoors – this foam or furry cover dramatically reduces wind rumble. Even some budget mics include a basic windscreen, and it’s a cheap accessory that can save your audio on a breezy day. In short, investing in audio gear and paying attention to sound will greatly enhance your stream’s quality and keep your audience hooked on every word.
- Professional-Grade Mic Options: High-end wireless lavalier systems (e.g. Sennheiser AVX, Shure or Rode Wireless GO II) or broadcast-quality shotgun mics. These offer superior audio clarity, longer range, and features like dual channels (for two mics) or noise reduction – ideal if you plan to stream in very noisy places or want the freedom to move without cables. They cost more and often require charging or swapping batteries, but deliver top-notch sound for a polished stream.
- Budget-Friendly Mic Options: Wired lavalier microphones or small on-camera mini-shotgun mics. A simple wired lav mic that plugs into your smartphone or camera can often be found for $20–$50 and provides a big improvement over the default audio. Similarly, a compact shotgun mic (with a short cable to your device) in the $40–$60 range can give clear forward-focused sound. These options are wallet-friendly and easy to use – just plug in and go – making them great for beginners. Just remember to secure any cables along your rig to avoid snags while moving.
Video and Stabilization: High-Quality Camera & Steady Footage
While IRL backpack kits usually include a camera (or assume you’ll use your smartphone camera), upgrading your video quality and stabilization is essential for a smooth, watchable stream. Viewers love clear, shake-free video that makes them feel like they’re right there with you on your adventures. If your footage is blurry, shaky, or struggles in low light, people might tune out no matter how interesting your content is. By investing in better video gear – which includes the camera itself and the tools to keep it stable – you’ll dramatically improve the viewing experience.
Camera upgrades: The “camera” in an IRL setup can range from a phone to an action camera (like a GoPro), or even a mirrorless or DSLR camera. The right choice depends on the level of quality you want, your budget, and how much weight you’re willing to carry. A professional-grade upgrade that some top IRL streamers opt for is using a compact mirrorless camera or high-end camcorder for streaming. These cameras (for example, a Sony A7C/A7S series or a Canon M50 Mark II, etc.) have larger sensors that produce crisp video with better detail, dynamic range, and low-light performance than typical phones or action cams. They can give you that cinematic look – like clearer night streams and a nice blurred background (shallow depth of field) if desired. When paired with a wide-angle lens, you can capture yourself and the environment beautifully. However, mirrorless cameras are significantly more expensive and heavier; you’ll also need to feed their output into your streaming encoder (often via HDMI) and power them (using dummy batteries or external power, see Power Solutions). They are a pro option for streamers who want the absolute best image quality and don’t mind carrying gear.
For many IRL streamers, a pragmatic choice is an action camera or a good smartphone – these are lightweight, durable, and simpler to use. Action cameras like the GoPro or DJI Osmo Action are popular because they’re built to be mobile: they often have excellent stabilization built-in and wide-angle lenses to capture a lot of the scene. They’re also usually weather-resistant. A current-generation GoPro (with features like HyperSmooth stabilization and 4K capability) can deliver sharp, smooth video while you’re walking or biking, and it can handle bumps and jolts without losing feed. Smartphones (especially flagship models) have very advanced cameras these days – with 4K video, optical image stabilization, and computational enhancements – so a high-end phone can double as both your camera and encoder. If you have a recent iPhone or Android phone, you might already have a great streaming camera in your pocket. The key is to ensure stabilization (more on that below). As a budget-friendly video option, using your smartphone you already own (or a second-hand one dedicated to streaming) is a cost-effective route. You can also find slightly older GoPro models for less money that still outperform basic webcams.
Stabilization (keeping the video steady): In IRL streaming you’re often in motion – walking, running, panning around – so stabilizing your camera is critical to avoid dizzying, shaky footage. A stable video is much easier to watch and gives a professional feel. There are two main ways to stabilize: using a camera with good built-in stabilization, and/or using a gimbal or stabilizer mount. Many action cams and phones have internal electronic or optical stabilization that smooths out small shakes. However, for truly fluid motion (like walking on uneven ground), a 3-axis gimbal is the gold standard. A gimbal is a handheld device with motors that actively counteract your movements to keep the camera level and steady, even if you’re moving around.
For a professional-grade stabilizer, consider a motorized gimbal suited to your camera. If you use a smartphone or GoPro, there are compact gimbals designed for them (e.g. DJI Osmo Mobile or Zhiyun Smooth series for phones, or GoPro’s Karma Grip / generic action cam gimbals). If you went with a mirrorless camera, you’d need a larger gimbal (like a DJI Ronin-SC or Zhiyun Crane M3) that can handle the weight. High-end gimbals offer advanced features like joystick control, better battery life, and the ability to fine-tune settings, ensuring ultra-smooth footage even when you’re running or quickly changing direction.
On the budget side, if your camera has decent built-in stabilization, you might skip a powered gimbal and use simpler aids: a sturdy selfie stick or hand grip and the camera’s own stabilizer might be enough for walking around. Newer phones and action cams can produce surprisingly steady video just handheld. You could also opt for a basic mechanical stabilizer (like a steadicam-style balanced pole) or a cheaper gimbal from lesser-known brands – these can cost significantly less, though they may not be as robust or smooth as the top-tier models. Another affordable trick: use a chest mount or body mount (we’ll cover mounts in detail later) to stabilize via your body’s natural damping – this can sometimes yield smoother footage than pure handheld, though a gimbal is still superior for stability.
Why it matters: A high-quality, stable video feed is the foundation of an engaging IRL stream. With the right camera and stabilization, viewers can clearly see all the details of that beautiful landscape you’re hiking, or read the signs and menus as you explore a night market, without the image blurring or bouncing around. In low-light scenarios (like an evening street or indoor venue), a better camera will maintain brightness and clarity, whereas basic cameras might produce dark or grainy video. A gimbal or good stabilization means when you’re walking and talking, the audience isn’t suffering from “shaky-cam” nausea; instead, it feels like a smooth first-person view of your journey. When you pan the camera to show something interesting, the motion will be clean and professional-looking, as opposed to jarring. All of this keeps viewers comfortable and focused on your content rather than distracted by technical issues. It’s especially crucial if you’re streaming fast-paced activities (like biking, running, or dancing) – stabilization will keep the action watchable.
In summary, upgrade your video setup to match your streaming style: if you mainly stream static or slow-paced scenes, a high-end camera will shine in visual quality. If you move a lot, prioritizing stabilization (gimbal/Action cam) is key. Ideally, aim for both good camera and good stabilization for the best of both worlds. Also remember to set your camera to appropriate settings (resolution/frame rate) that your network can handle – 1080p at 60fps is a common target for professional-looking smoothness, but you might use 720p or lower if bandwidth is limited. With solid video gear in place, your IRL stream will look crisp and enjoyable, letting content and personality take center stage.
- Professional-Grade Camera & Gimbal: A mirrorless or high-end compact camera paired with a robust 3-axis gimbal. For instance, a Sony mirrorless with a wide-angle lens on a DJI or Zhiyun stabilizer can produce broadcast-quality video with cinematic stability. Another pro setup could be a top-tier action cam (like the latest GoPro Hero) mounted on a gimbal to further smooth out motion. These setups deliver the best image quality in various lighting and the steadiest footage, though they involve higher cost, heavier gear, and a bit more setup know-how.
- Budget-Friendly Video Setup: Use a smartphone or mid-range action camera you already have (or can acquire cheaply) along with its built-in stabilization, possibly combined with a basic handheld stabilizer. For example, a modern smartphone with optical image stabilization, held in a generic $20 selfie-stick that doubles as a tripod, can do a reasonable job for casual IRL streaming. You can also find older model gimbals or second-hand units for under $100 that support phones and GoPros – a great entry-level way to get smoother video. While the absolute image quality or night performance might not rival a pro camera, this budget setup can still achieve a stable 720p/1080p stream that keeps viewers happy, all without breaking the bank.
Power Solutions: Reliable Batteries and Power Management
One of the less glamorous but absolutely crucial elements of any IRL streaming setup is power. Streaming live video, running multiple devices (camera, encoder, phone, modems, etc.), and using accessories like lights or gimbals can consume a lot of energy. The last thing you want is your stream abruptly cutting off because a battery died – not only does that end your content prematurely, but it can also be harmful for your equipment if it loses power suddenly. To keep your streams running strong for hours on end, you’ll need robust power solutions beyond the single battery that came with your backpack kit.
Portable battery packs: Most IRL backpacks include a large power bank to run the gear. However, depending on your stream length and any extra devices you add, you may need additional or bigger batteries. An external battery pack (often a USB power bank) is the lifeline of an IRL stream. These are essentially high-capacity rechargeable batteries that can charge or directly power your devices via USB (or USB-C, DC output, etc.). It’s essential to choose packs that can supply sufficient output for your setup. For example, if you have a router, a camera, and a phone all drawing power, you might need a battery that has multiple outputs and high wattage support (some power banks can output 60W+ through USB-C PD, useful for powering more demanding devices).
A professional-grade power solution might involve using V-mount or Gold-mount batteries (the kind used in professional video rigs) or other heavy-duty battery systems. These batteries are built for long-duration shooting – they can be very high capacity (often 95–150 Wh or more) and have secure connections. You’d typically attach a plate that converts their output to usable voltages (5V USB, 7.4V for cameras, etc.). Pro batteries and power distributors can allow for hot-swapping (replacing a depleted battery with a fresh one without cutting power, if you have two in parallel), meaning virtually infinite stream time if you have spares charged. This is a more expensive route and adds weight, but it provides ultimate reliability for marathon streams or remote expeditions where charging isn’t possible. Some advanced backpack setups use a combination of a built-in battery plus an extra Power distribution unit that feeds multiple devices and regulates voltage, ensuring each component gets steady power.
For most streamers, USB power banks are the go-to. Look for high-capacity packs (10,000 mAh up to 30,000+ mAh) from reputable brands – these will give you many hours of runtime. For example, a 20,000 mAh bank can often keep a basic phone stream going for 8+ hours. If you have a backpack with lots of gear, you might carry two such banks: one actively in use and one as backup or to hot-swap when the first runs out (some streamers actually run two in parallel with a simple switch, or just take a quick break to swap cables). Fast-charging and pass-through support are useful features: fast-charging means you can refill the battery pack quicker when you do get to an outlet, and pass-through means the battery can charge and discharge at the same time (for instance, you could plug the pack into wall power and it can power your devices while recharging itself). Pass-through isn’t available on all banks, but it’s handy if you occasionally get to plug in (say at a café) – it lets you top up without shutting down your gear.
Cables and adapters: Along with batteries, don’t forget the cables. Use good quality, durable cables for all your charging/power needs – these get a lot of wear in IRL setups. You might need USB-C cables, Micro-USB, Lightning, or even DC barrel plug cables depending on devices. Having spares is part of power management (a frayed cable can end a stream if you don’t have a backup). Also consider things like DC couplers (dummy batteries) for cameras – these are battery-shaped adapters that let you plug your camera into a power bank or outlet, so you’re not limited by the camera’s tiny internal battery. If your IRL backpack uses a mini PC or router, ensure you have the proper power adapter for it (some take 12V or 19V inputs – often provided by the backpack’s design, but double-check if you add or change devices).
Why it matters: Quite simply, without power, there is no stream. Strong power solutions enable you to stream for longer hours and cover entire events or long outdoor trips without worrying about “battery anxiety.” They also add reliability – if one battery fails or depletes, having another means your stream and gear stay on (you can gracefully switch rather than crashing out). This is especially important for outdoor IRL streamers who may be far from any charging point for many hours. A well-powered rig also protects your equipment: sudden loss of power can corrupt video files, crash the streaming encoder, or force a reboot that might cause wear and tear. Keeping everything powered steadily maintains the health of your devices.
For example, if you plan to do an all-day city tour stream, you might be live for 6–8 hours. A single phone battery would die after 2–3 hours of streaming; a single moderate power bank might get you close, but to be safe you likely need a high-capacity bank or a couple of them. Similarly, if you’re covering a convention from morning till evening, you’ll go through a lot of battery keeping cameras, Wi-Fi hotspots, and your phone alive. With ample power, you can focus on the content instead of constantly checking battery percentages.
Power management tips: Keep your power banks charged up before each stream and if possible, carry a lightweight spare battery for critical devices (for instance, some streamers carry a tiny lipstick-sized battery as a backup to charge their phone in emergencies). Also, consider a car charger or AC inverter if you will be in a vehicle – you can recharge batteries or run gear off a car’s power port between locations. In extreme outdoor use, there are even solar chargers – these are very slow and weather-dependent, so they are more of an emergency backup for multi-day remote streaming, but worth noting as an option. For most, the strategy is: take more mAh than you think you’ll need, and have a plan to swap or recharge if you’re going longer. It’s better to end the day with extra battery left than to run out mid-stream.
- Professional-Grade Power Options: High-capacity battery systems and power distribution. This could be a 26,800 mAh rugged power bank with multiple outputs (some models are designed for laptops/cameras and very reliable) or stepping up to cinema-grade batteries (V-mount) with a power adapter hub. These solutions can power numerous devices simultaneously with stable voltage. They often come at a premium price, but they ensure you can stream all day (8+ hours) without interruption. For example, a pro might use a 98 Wh V-mount battery (often $200 or more) that can run a camera, encoder and modem via a custom cable harness – the stream could theoretically run for half a day on one battery.
- Budget-Friendly Power Solutions: Standard USB power banks (5,000–20,000 mAh) and spare device batteries. A common budget setup is to carry two affordable USB power banks (for instance, a pair of 10,000 mAh packs). Use one until it’s empty, then switch to the other. These are widely available and relatively inexpensive. While they may not have fancy features, a reliable brand’s basic power bank will still keep your stream going for several hours. If you’re streaming with just a phone, even a single decent 10,000 mAh pack (often $20–$30) can roughly double or triple your phone’s life. As another example, if your camera or hotspot has removable batteries, buying a couple of extra manufacturer batteries (or compatible third-party ones) and charging them ahead of time is a low-cost way to have backup power (though swapping them will require a brief downtime, unlike a power bank which can feed continuously).
Network Stability: Multiple Connections and Internet Reliability
Perhaps the most critical aspect of IRL streaming is maintaining a stable internet connection. All the great video and audio gear won’t matter if you can’t actually upload your stream smoothly to the platform. When you’re streaming from unpredictable locations, you have to contend with variable cell signal, crowded networks, and sometimes dead zones. A ready-made IRL backpack usually addresses this with at least one cellular modem (often more) and an encoder that can do bonding (combining multiple connections). To go beyond the basics, you should consider strategies and accessories to bolster your network stability so your viewers enjoy a buffer-free, continuous broadcast.
Multi-modem bonding: Professional IRL setups use bonded connections – this means they send data over multiple cellular networks (and Wi-Fi if available) simultaneously, so if one link weakens, the others compensate. Many backpacks come with two or more USB modems or SIM slots for this purpose. To enhance stability, you might add additional modems or subscribe to multiple carriers. For example, having one SIM on Carrier A and another on Carrier B ensures that if one carrier has poor coverage in a spot, the other might still have signal. Some high-end solutions support 3 or 4 modems, including 5G modems for higher bandwidth and lower latency. A professional-grade network setup could be using a dedicated bonding router or device (like a Peplink Pepwave router or LiveU unit) that can aggregate several connections. These devices are designed to seamlessly handle network switching and bonding at the hardware level, often giving the best reliability (they’re used in live news broadcasting, etc.). They can be costly and sometimes require ongoing service subscriptions, but they dramatically reduce stream drops in challenging conditions such as moving vehicles or crowded city centers where one network might get congested.
For those not using an expensive bonding hardware, there are software solutions (like Speedify or Mushroom Networks’ software) that can run on a small laptop or Raspberry Pi in your backpack to bond connections. In either case, having multiple internet sources is key. If your IRL backpack came with one modem, think about adding a second (many encoders allow this via USB or tethering a phone). If it came with two, maybe add a third as backup, etc. The diminishing return kicks in after a few connections, but generally at least two is highly recommended.
Hotspots and SIM management: Another accessory in this category is a dedicated mobile hotspot device (MiFi). If your backpack or encoder supports Wi-Fi input, you can use an external hotspot as an additional connection. Some streamers carry an unlocked 4G/5G hotspot that they can just turn on and throw in the bag, rather than multiple USB dongles – it’s essentially the same idea (multiple carriers). Additionally, you’ll want to manage data plans – consider unlimited or high-cap data SIMs to avoid throttling. A tip is to get prepaid data SIMs for various regions if you travel, or SIMs for each major carrier in your country so you have options. Keep spare SIMs and a small SIM eject tool in your kit (this is a tiny QoL tool, but useful if you need to swap).
External antennas: Some modems or hotspots allow attaching an external antenna. As an optional but useful accessory, high-gain antennas can boost signal quality in weak reception areas. For example, you can mount small antennas on top of your backpack or a shoulder strap – these might pull in a 4G signal in rural areas where the tiny antenna in a USB stick struggles. There are omni-directional antennas (which pick up all directions, good for moving) or directional ones (which you’d aim toward a cell tower if stationary). This is a more advanced add-on, but it’s part of a pro streamer’s arsenal when going to spotty-signal locations.
Why it matters: Network stability directly affects the viewer’s experience – if your connection is unstable, viewers will see buffering, lag, or the stream might drop entirely. Frequent disconnects and quality drops can frustrate an audience and make your stream appear unprofessional. In worst-case scenarios, you might miss capturing important moments because the stream cut out. By fortifying your network setup, you aim to have a smooth stream even as you move between different areas (e.g., walking from outdoors into a building where one carrier’s signal might falter). At big events like festivals or conventions, cell networks get saturated with thousands of people – having multiple carriers and possibly a priority data plan on one (some carriers offer plans that are less likely to be throttled in congestion) can keep your stream live while others might struggle. If you’re trekking through nature, you may hit zones with only one bar of reception; an antenna or a second network might be the difference between maintaining a low-bitrate stream versus dropping entirely.
Ultimately, a strong network setup expands where and how you can stream. You can confidently plan streams in challenging places (crowded downtown areas, moving vehicles like trains/buses, remote parks) if you know you have redundancy in your connections. It also provides peace of mind: you’ll spend less time staring at your bitrate readout anxiously and more time focusing on content and interaction.
- Professional-Grade Network Setup: Dedicated multi-modem bonding hardware (or service) with 2–4 cellular connections across different carriers. For example, a LiveU Solo or a Peplink multi-WAN router with several USB modems can keep a stable 1080p stream by intelligently load-balancing data. Pro setups often include external paddle antennas or even a roof-mounted antenna array (if streaming from a vehicle) for maximum signal. This route can handle high-bitrate 720/1080p streams in conditions where a single phone might only manage 480p or drop entirely. The cost includes extra data plans for each modem and possibly a bonding service subscription, but it provides the most robust connectivity available.
- Budget-Friendly Network Solutions: Leverage a couple of smartphones or inexpensive hotspots for multiple connections. On a budget, you might use your main phone’s data plus a secondary phone on a different carrier (or a cheap USB 4G dongle with a prepaid SIM) and use software bonding (some apps or streaming software support using multiple connections or at least quick switching between Wi-Fi and cellular). Even if you can’t do true bonding, having a backup connection is valuable – for instance, if you know one carrier has dead zones, you can manually switch to another as needed. Another simple approach is to pick the single carrier that has the best overall coverage in your typical stream area and use a good unlimited data plan there, along with tweaking your stream bitrate to be conservative to avoid overloading that connection. While this won’t be as fail-safe as a bonded pro setup, it’s far better than relying blindly on one unstable signal. Many IRL beginners start with just a decent smartphone on 4G and maybe a spare battery for it – just recognize the limitations and plan around them (stream at off-peak cellular hours, stay in strong signal zones, etc.). As you grow, you can add another connection when budget allows to improve reliability.
Mounts and Rigs: Hands-Free Carrying and Camera Support
Streaming in real life means you’re often moving around, performing tasks, or needing your hands free. Having the right mounting solutions for your camera and other gear can make a world of difference in both stream quality and your comfort. Rather than clutching a camera or phone in your hand at all times (which leads to shaky video and arm fatigue), you should equip yourself with mounts that let you securely attach your camera to various places: your body, backpack, or fixed objects. Mounts keep your shot stable when you’re not actively holding the camera and allow for creative angles and safer movement.
A combination selfie stick and mini tripod can serve as a versatile mounting solution, allowing streamers to both hand-hold the camera and set it down stably when needed.
Handheld mounts (Selfie sticks and grips): A selfie stick or telescoping pole is a staple for many IRL streamers. It allows you to hold the camera at a distance (great for getting yourself in frame along with background, or for high-angle shots above crowds) and often collapses down for portability. Many selfie sticks double as tripods with fold-out legs at the base, which means you can also set them on the ground or a table to act as a stand when you need to put the camera down. A good stick or grip will have a solid phone/camera mount that keeps your device secure, and perhaps a wrist strap for safety. Professional versions might be carbon fiber (for strength and light weight) and very sturdy, whereas budget versions might be aluminum or plastic – lighter on the wallet, but possibly a bit less stable if extended fully.
Tripods and stands: If you foresee times when you’ll want to film yourself from a short distance (for example, streaming a cooking session in a kitchen or performing at a street corner), a tripod is invaluable. A professional-grade tripod could be a full-size camera tripod that is stable even in wind and allows smooth panning – great for high-quality stationary shots. They can, however, be heavy to carry around. Many IRL streamers opt for mini tripods or Gorillapods (flexible tripods) as a compromise: these can be attached to the bottom of your selfie stick (as in the combo units) or used on their own for tabletop or ground shots. A Gorillapod (those tripods with bendy legs) lets you wrap or prop your camera on uneven surfaces, even attaching to poles or railings – handy in urban environments. As a budget option, small tripods are very affordable and can fit in your backpack easily. They might not reach eye level, but they give you the freedom to step away from the camera while it stays aimed at you or to get a steady timelapse shot.
Body and wearable mounts: To truly go hands-free, consider mounts that attach the camera to your body or backpack. A common one is a chest mount harness (often used with GoPros). This straps around your shoulders and chest, holding the camera in the center of your torso. It provides a stable, first-person perspective – perfect for activities like hiking, biking, or anything where you want to use both hands (climbing, cooking, etc.) while streaming. The view from a chest cam is less bouncy than a purely hand-held camera since your torso absorbs some movement. Another option is a shoulder or backpack strap clip – these devices (like a clamp) let you attach a camera (or phone) to the strap of your backpack at chest or shoulder height. It’s like a bodycam perspective. This is popular because you can walk normally and your camera just rides along; whenever you want a break from holding gear, you clip it in place. There are also head mounts (head straps or helmet mounts), which put the camera on your forehead or helmet for a true POV view (viewers see exactly what you look at). Head mounts can be thrilling for certain streams (like sports or exploring tight spaces), but they don’t allow your audience to see you, and quickly looking around can make viewers dizzy. So, those are more niche but useful in specific scenarios.
Vehicle and miscellaneous mounts: If you might stream from a car, motorcycle, or any vehicle, suction cup mounts can stick a camera to a windshield or window. This is great for road trip streams or IRL driving content – it gives a stable view without you holding the camera (and keeps it out of your way so you can drive safely). Clamp mounts can attach to tables, bike handlebars, or other objects. For instance, a C-clamp with a ball head can mount your camera to the side of a table in a café (for an unobtrusive stationary shot), or onto a music stand if you’re streaming a performance, etc. These kinds of mounts expand the versatility of where you can position your camera.
Why it matters: Using mounts and rigs accomplishes a few important things: (1) It stabilizes your footage – a camera fixed to a mount will generally be steadier than one in your hand, especially if you’re tired. (2) It frees your hands, which is crucial for safety and for doing other activities. For example, if you’re crossing a busy street or climbing a trail, you shouldn’t be fiddling with a camera; a chest or backpack mount allows you to focus on your path while still streaming. If you’re at a food stall trying some cuisine on stream, a small tripod on the counter lets you appear on camera without needing one hand constantly holding the camera. (3) It enables creative angles and more engaging shots. With a variety of mounts, you can switch between a “talking to camera” selfie view on a stick, to a POV hands-free view when you need to use both hands, to a wide establishing shot on a tripod when you want to show the whole scene or yourself from a distance. This dynamic use of camera angles can make your stream more interesting and professional, almost like having a camera crew or multiple cameramen – but it’s just you swapping mounts.
Also, mounts contribute to comfort. Carrying even a lightweight camera for hours will strain your arm; a good shoulder strap clip means you can take that weight off and let your body carry it with proper support. When you pause to sit, having a tripod means you can truly relax for a moment without ending the stream or subjecting viewers to a crazy tilted view if you just placed the camera down awkwardly. All in all, mounts are quality-of-life for both streamer and viewer, and they help you get shots that would be impossible to maintain otherwise.
- Professional-Grade Mounting Solutions: High-quality mounting gear like heavy-duty carbon fiber monopods/selfie sticks, branded camera harnesses, and robust tripods. For instance, a Manfrotto or Peak Design travel tripod offers superb stability and quick setup, albeit at a higher price. A professional chest mount or backpack clip might have metal parts and secure locking mechanisms (there are even motorized gimbals that integrate with body mounts for ultimate stability). Pro mounts are durable and reliable – important if you’re mounting expensive camera gear. They also often have quick-release systems, so you can rapidly move your camera from a handheld gimbal to a tripod plate or to a clip on your bag without unscrewing things – this is a huge benefit for efficiency while live. If you plan to do a lot of varied shooting, investing in a mounting ecosystem (all compatible with the same quick-release plates, for example) is a pro move.
- Budget-Friendly Mounts: Inexpensive selfie sticks and basic harnesses. You can find a decent telescoping selfie stick with a universal phone holder for under $20; many come with tripod feet built-in, which gives you two functions in one. These may not be the most sturdy if fully extended (your camera might wobble in strong wind or if someone bumps it), but for everyday use they work fine. Simple chest strap mounts designed for GoPros are very affordable as well (often $15-$25) and usually come with the standard three-prong mount that can be adapted to hold phones or other cameras using an adapter. While they might use more plastic and less ergonomic design than pricey ones, they’ll still let you go hands-free on a budget. For static shots, a lightweight mini tripod or even a clamp with a phone holder can be just a few dollars and can fold up in your pocket. These budget mounts may not last as long or hold really heavy gear, but they’re a great starting point to learn what angles you like to use, and you can always upgrade piece by piece later.
Protective Gear: Weatherproofing and Equipment Protection
IRL streamers face the elements – from sudden rain showers and blazing sun to dusty trails and accidental drops. Protecting your gear (and yourself) from weather and environmental hazards is essential to keep the stream going and avoid damaging your equipment. A ready-made backpack might not include specialized weather protection beyond maybe a basic rain cover for the bag, so it’s wise to prepare your own set of protective accessories. This category includes anything that safeguards your camera, electronics, and you, the streamer, from rain, wind, extreme temperatures, and physical impacts.
Rain protection: Water is the enemy of electronics. If you get caught in rain mid-stream, you need a quick way to shield your camera, phone, modems, and battery. An umbrella is a simple solution if you can manage one while streaming, but often you’ll want your hands free, and umbrellas can be unwieldy if it’s windy or crowded. Instead, use weather-resistant covers: for your backpack, a waterproof rain cover (often a nylon sleeve that goes over the entire bag) is a must-have. Many backpacks have a rain cover included or you can buy a generic one that fits. For your camera, consider a rain sleeve or rain jacket made for cameras – basically a plastic or nylon cover that cinches around the lens and has a clear window so you can still operate the camera. These come in professional versions (reusable, with sleeves for your hands to adjust settings) or very cheap disposable plastic bag versions. Even a plain clear plastic bag or shower cap can be improvised to cover a camera in a pinch (pro tip: carry a couple of large zip-lock bags in your kit – they’re great emergency covers for cameras or anything, and also keep dust out when not in use).
If you use a smartphone, get a waterproof phone case or pouch. There are dry bags with clear touch-sensitive plastic that let you continue using the phone under rain (or even underwater, though streaming underwater is another challenge!). For action cameras like GoPros, many are inherently waterproof without a case – but ensure the ports are sealed and the battery door is closed properly. If not, use the waterproof housing accessory. Also remember items like your microphone: if it’s not a waterproof mic, try to shield it or unplug it if torrential rain hits (some mics might short out if soaked).
Sun and heat protection: The opposite of rain – a very hot sunny day – can also be problematic. Electronics can overheat if exposed to direct sun for long periods, especially phones and cameras which might shut off when too hot. One helpful accessory is a reflective sun shade or cover for your equipment when you’re stationary under intense sun. For example, you could drape a small reflective cloth (even something like an emergency foil blanket) over your backpack or camera when you pause in sunlight. It keeps them cooler than if dark-colored gear is baking in the sun. There are also lens hoods for cameras which not only improve image quality by blocking lens flare, but also provide a bit of shade to the lens and sensor. If you stream in hot climates often, a USB fan is a neat optional accessory – a tiny fan can be plugged into your power bank and pointed at your router or phone to increase airflow and cooling. Some streamers have attached small fans inside their backpack to cool the modem/encoder which can run hot after hours; this is a pro trick to prevent heat-related crashes. Don’t forget sunscreen and a hat for yourself – a sunburnt streamer might have to cut their adventure short, and being physically comfortable will help you stream better (this crosses into personal care, but it’s part of dealing with weather).
Dust and dirt: If you’re doing outdoor streams like beach trips, desert hikes, or even dusty festival grounds, fine particles can get into your gear. Using protective filters or covers on your camera lens (e.g., a simple UV filter acts as a sacrificial glass – it’s easier to clean or replace than a scratched camera lens) is a good idea. Keep a microfiber cloth and perhaps a small lens cleaning kit to wipe off dust or rain droplets from your camera lens – clear optics make a clear picture. For your backpack and gear, dust covers and keeping zippers closed when not accessing helps. If you have vents on a router or fan, periodically check they aren’t clogged with debris.
Physical protection: IRL streaming gear gets jostled. Running or cycling can shake things, and there’s always the risk of dropping a camera or your phone. Using protective cases and mounts that secure devices is essential. For instance, if your phone is your camera, use a rigid phone clamp mount that won’t let it slip out (many have rubber grips and a locking screw). Use tethers – some cameras have a little loop for a wrist strap, or you can attach a thin steel tether from the camera to your backpack strap, so if it accidentally slips from a mount, it won’t hit the ground. Your backpack itself should be sturdy and padded to protect the contents; you might add extra padding around fragile items like the camera or modem. If you’re in a situation with potential impacts (like maybe you’re skating or doing a sport on stream), consider a protective cage for your camera (metal frames that go around a camera) or at least keep devices in padded pouches when possible.
Why it matters: Weather and environmental protection is all about stream uptime and gear longevity. By being prepared for rain or shine, you can continue streaming when others might have to stop. Imagine you’re streaming a live outdoor event and it starts to drizzle – if you can quickly rain-proof your gear, your stream carries on and viewers stay with you, impressed that you’re handling it. If not, you’d have to shut down, possibly missing the main event. Over the long term, protecting your equipment from damage means fewer repairs and replacements – which is cost-saving. Electronics that are kept dry and clean will perform better and last longer. Also, there’s personal safety and comfort: wearing appropriate weather gear yourself (rain jacket, warm layers, etc.) means you can keep streaming longer without risking your health. A miserable, soaked streamer is likely to cut the stream short (and not have much fun content anyway). Taking precautions lets you stream with confidence in more varied conditions.
Moreover, viewers subconsciously appreciate when a stream is uninterrupted by external factors – if they see you seamlessly handle a sudden weather change, it adds to your credibility as a seasoned streamer. It also ensures continuity of the story you’re sharing; you don’t have to say “I’ll be back after the rain” – you never left. In summary, a little foresight in protective accessories goes a long way in maintaining a professional, consistent stream and safeguarding the gear that makes it possible.
- Professional-Grade Protection: Purpose-built weather gear and rugged equipment. This could include things like a dedicated camera rain cover (from brands like Think Tank or PortaBrace) that fits your camera model perfectly, heavy-duty backpack rain covers that also cover protruding antennas or tripods, or even a custom hard-case for transporting your equipment between streaming sessions (like a Pelican case with foam for flights/travel – ensuring nothing gets crushed). Pros might also invest in weather-sealed cameras and lenses – many higher-end cameras have gaskets and seals that make them resistant to water and dust. Pairing that with a weather-sealed microphone means a bit of rain won’t stop the show. You can also get ruggedized smartphones or cases (some streamers put their phone in a tough OtterBox case, for example, for drop protection). Professional gear insurance is another aspect: not an accessory per se, but something pros do for protection – however, focusing on gear, the idea is to use equipment rated for harsh conditions if you plan to frequently stream in such conditions.
- Budget-Friendly Protection: DIY and low-cost protective measures. Many protective accessories can be improvised or bought cheaply. A simple plastic rain poncho (costs a few dollars) can cover you and your backpack in sudden rain – it’s not fancy but it works. Zip-lock bags and plastic wrap can save your electronics from water damage and cost basically nothing. For sun, an inexpensive reflective windshield shade (the kind used in car windshields) can be cut or folded to cover gear when stationary. Using cheap clear tape to reinforce or weather-seal parts of your setup (for instance, tape over unused ports during a sandstorm) is a quick fix. Instead of pricier camera sleeves, even a shower cap from a hotel can stretch over a camera or the top of a gimbal to keep it dry – those are free and surprisingly effective for light rain! Foam padding or bubble wrap in your backpack can protect items on a budget – reuse packing materials to line your gear compartments. Basically, think ahead about the elements you might encounter and pack a small “weather kit” with items like plastic bags, cloth, tape, and an extra rag. These won’t be as convenient as custom gear (you might have to rig a plastic bag in an awkward way), but they absolutely can save your stream and gear in a pinch for minimal cost.
Communication & Monitoring: Smartphones and Stream Monitoring Tools
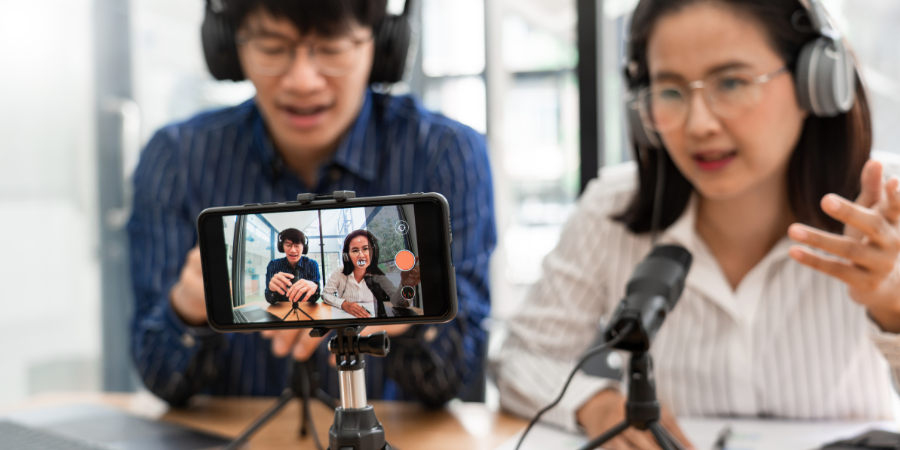
While cameras, mics, and connectivity get a lot of attention, a critical accessory for any IRL streamer is a way to monitor your stream and interact with your audience in real time. IRL streaming is interactive – viewers are chatting, sending alerts or donations, and you need to be aware of that feedback to respond, adjust, or troubleshoot. This is where a secondary device or monitoring setup comes in, typically a smartphone. If you’re using a dedicated camera (like a GoPro or mirrorless) to stream, you won’t be able to see chat or notifications on that device. And if you’re streaming from your phone, the streaming app might not make it easy to also read chat on the same screen (though some apps do overlay chat, it can be hard to manage while filming). Therefore, having an extra screen – usually your personal phone or a spare phone – is essentially essential for a smooth IRL streaming experience.
Smartphone or secondary display: Most IRL streamers carry a second smartphone: one acts as the camera/encoder, and the other is open to the streaming dashboard or chat application. If you have an IRL backpack with something like a LiveU or a Raspberry Pi setup, then you definitely need a phone or small tablet to control the stream and read chat (since the encoder itself has no interface). Using a phone, you can run the streaming platform’s app (Twitch, YouTube, etc.) in moderator view or simply the stream view to see incoming chat messages. You can also use it to send messages, adjust stream title, check your stream quality, etc. Why not rely on one device? Because if that one device is busy encoding video, you may not be able to easily monitor at the same time – plus if something goes wrong with it, you lose both the stream and your communication channel. Separating them adds redundancy.
A professional setup for monitoring might be a small mount on your rig that holds the second phone in view as you stream. For example, some streamers attach a phone mount onto their gimbal or selfie stick, so that just below or above the camera, there’s a screen showing the chat. This way, while you’re filming, a quick glance gives you the chat feed, almost like a teleprompter. There are even small wearable displays or AR glasses that some tech-savvy streamers have experimented with (which could show chat in one eye’s view). Those are still experimental and not common, but they illustrate the desire to integrate monitoring seamlessly. At a minimum, have the Twitch/YouTube app open to see chat; or use third-party combined chat apps if you multistream. If carrying a tablet is feasible, a larger screen like an iPad mini can show chat more clearly (some IRL streamers in vehicles mount a tablet on the dash to read chat). But a smartphone is usually the practical choice for mobility. Ensure the device has a decent battery or keep it plugged into your power bank, because running a screen continuously with internet can drain it (again tying into power solutions).
Audio monitoring and feedback: In addition to seeing chat, you might want to hear alerts or monitor audio. Many IRL streamers use a single earbud or headset for this. For example, you can connect a Bluetooth earbud to your streaming phone to get a ping when someone subscribes or a text-to-speech donation message plays. If you can’t hear these, you might miss things your audience is expecting you to react to. Using just one earbud (or a bone-conduction headphone that keeps your ears open) is important for safety – you still need to hear your surroundings (traffic, people) with the other ear. Bone conduction headphones rest on your cheekbones and transmit sound without blocking your ear canal; these are great for hearing stream alerts while leaving your ears open to ambient sound. A professional approach might be an in-ear monitor like those musicians use on stage, which are low-profile and can be secured so they won’t fall out while you move. But you’d likely only wear one side of the IEM to stay aware of surroundings.
The earbud can also help you monitor your own audio quality – occasionally you might unmute the stream audio briefly to ensure your mic is working and the levels are okay. Some streaming apps or devices allow you to monitor the audio directly (listening to your mic through the earbud in real time or with slight delay). This is helpful at events with loud noise; you’ll know if your voice is being drowned out or if the mic cut off.
Stream control: Your monitoring device (phone) also doubles as your remote control for the stream. If something goes wrong – say, your bitrate drops or chat is saying the stream is lagging – you can use the phone to adjust settings or restart the stream if needed. If a moderator flags something, you can see it. Essentially it’s your command center. So treat it as a key part of your kit, not an afterthought.
Why it matters: Interaction is the heart of live streaming. If you don’t see your chat in real time, you’re basically vlogging, not streaming interactively. Viewers expect you to respond to their questions or at least acknowledge donations/comments relatively promptly. Missing these because you didn’t have a way to see them can make viewers feel ignored. Conversely, when you react in real time (“Oh hey, thanks for the tip, JohnDoe123!” or answering a question someone just asked), it greatly increases engagement and viewer satisfaction. Technically, monitoring helps you catch issues early – if chat all of a sudden says “no sound!” or “lag!”, you can address it within seconds rather than finding out minutes later (by then, many viewers might have left). Also, having a separate device means if your main streaming rig crashes, you can communicate via the second device to let your audience know you’re fixing it, or tweet an update, etc. It’s your lifeline.
From the streamer’s perspective, it’s also more fun and comforting to see the chat messages coming in. IRL streamers often don’t have the chat visible on the same screen like gaming streamers do, so this phone is the substitute. It reduces the “streamer blindness” where you’d otherwise talk to a camera not knowing how people are reacting. That feedback loop is critical to shape your content on the fly (maybe chat suggests you try a different food at the market, or asks to see something around the corner – you can pivot and do that, making a better stream).
Finally, being able to monitor allows you to manage stream quality (bitrate, reconnecting if needed, adjusting camera if it went out of focus, etc.). It’s like having the control panel of your broadcast with you. Without it, you’re flying blind hoping everything is okay.
- Professional-Grade Monitoring Gear: High-end smartphone (or small tablet) mounted strategically, plus an in-ear monitoring setup. For example, using the latest iPhone or a robust Android phone with a bright screen ensures you can read chat even in daylight. A custom 3D-printed phone mount on your gimbal or a commercially made dual-device holder will keep it in your line of sight. On the audio side, something like Shokz (Aftershokz) bone-conduction headphones or a single AirPod Pro can provide clear audio cues without isolating you from the environment. Professionals might also integrate a private audio channel with a remote support person – e.g., a friend on Discord who can talk to you in your earpiece to provide information (this is advanced, like having a producer). While not common for most, some big IRL streamers do have a moderator who can feed them important info via an earpiece. That requires a good audio setup to handle both stream audio and that communication.
- Budget-Friendly Options: Use your existing phone for chat and a simple earbud. If you only have one phone, you can stream from it and use features like text-to-speech for chat (some streaming apps can read chat messages out loud to you) or periodically stop to read chat. However, a better budget solution is to get an inexpensive second-hand phone or a budget Android specifically for monitoring – it doesn’t need to be fancy, just able to connect to the internet and run your platform’s app or a web browser. Even a used $50 phone or older device you already had can serve as a chat monitor. Mounting can be DIY: use a velcro strap or rubber phone holder attached to your main rig so you don’t have to hold it separately. For hearing alerts, a basic wired earbud (the kind that might have come with an old phone) plugged into your streaming device can work – you’ll hear the stream sounds directly. It’s not wireless but it’s cheap and reliable. Alternatively, a single cheap Bluetooth earbud can be found for $10–$20 that will do the job. Just be sure to test that it doesn’t cause any echo or audio issues on stream (usually it won’t, if you’re only monitoring). This budget monitoring setup ensures you’re still interactive and in control, without requiring a big investment beyond maybe repurposing gadgets you have on hand.
Optional (Nice-to-Have) Accessories for IRL Streaming
After covering the essentials, let’s explore some optional accessories that, while not strictly required to start streaming, can significantly enhance your content or make your life easier. These are “nice-to-have” upgrades you might consider as you refine your IRL setup or pursue specific types of streams. Depending on your streaming style (urban vlogger vs. nature explorer vs. event journalist), some of these could even feel essential to you, but generally one can stream without them. We’ll again present professional-grade vs. budget-friendly takes on each. Mix and match these enhancements as you see fit:
Lighting: On-the-Go Illumination for Low-Light Streaming
If you plan to stream during the evening, at night, or in dim environments (like indoor venues, restaurants, or clubs), having a portable lighting solution can dramatically improve your video quality. Good lighting ensures that your camera can see you and your surroundings clearly without resorting to grainy high-ISO footage. It also helps colors pop and conveys the atmosphere better. While daytime streamers might never need an extra light, those magical night adventures or indoor IRL streams will benefit from a bit of fill light.
Portable LED lights: The most common lights for IRL streamers are small LED panels or cubes that can mount on your camera rig. These lights are usually rechargeable and offer adjustable brightness. Some even let you adjust color temperature (warm/yellow to cool/blue light) to match the environment and avoid looking washed out. A professional-grade LED panel might be something like a Lume Cube Panel Pro or Aputure MC—these are credit-card sized devices that output strong, even lighting and often have features like color adjustment or even RGB options (meaning you could add a colored accent light if desired). They typically have a cold shoe mount or a 1/4-inch thread so you can attach them alongside your camera (for example, on top of a camera cage or on your selfie stick if it has an accessory mount). They provide a smooth, diffused light that’s flattering and can be dimmed low or cranked up if you’re in a really dark street.
A budget-friendly light might be a simple clip-on selfie light or LED cube (some are as cheap as $15-$20). These often use a few LED bulbs and maybe have a couple of brightness settings. They can clip onto your phone or sit in your bag until needed. While they may not be as powerful or color-accurate as pro lights, even a small light can help illuminate your face in the dark, which is important because viewers like to see your expressions, not just a silhouette.
Another style is a ring light that attaches around your phone lens – these are popular for selfies and can work for streaming if you’re primarily using a phone at night. They cast a soft, even glow on your face. However, ring lights can be a bit bulky to carry around for IRL, and they might draw attention.
Using light subtly: When out in public, remember that shining a bright light can be intrusive or draw unwanted attention. The goal is usually to add just enough light that the camera sees well, but not so much that you look like you’re carrying a spotlight. Often keeping the light on a low setting is enough, using it as a fill to eliminate heavy shadows on your face. Also, consider diffusion: some lights come with a diffuser (a white plastic cover) to soften the light, which makes it look more natural and less harsh. If your light is too direct, you can improvise a diffuser with a bit of white cloth or even tissue paper over it (careful not to overheat the LEDs, though most LED lights stay cool).
Specialty lighting: If you’re into creative streams, you might use lights in other ways. For example, if you do camping or outdoor night streams, a headlamp can both help you see where you’re going and illuminate what you’re looking at (though headlamps often create a harsh beam). Some streamers exploring dark places use infrared lights combined with an IR-sensitive camera to see in total darkness without visible light – that’s a very niche, ghost-hunting style setup, but interesting to mention. Generally, a small visible light is more straightforward and useful.
Why it matters: Without added light, your camera might struggle in darkness, leading to a noisy (grainy) image or low frame rates (choppy video) as it compensates. Viewers might only see darkness or a very blurry figure, which isn’t engaging. By casting even a little light, you maintain clarity. Your face being lit allows for emotional connection – viewers can see you smiling or reacting, which is huge for engagement. Also, if you’re showcasing something (say the details of an art piece at a night market or the texture of a meal in a low-light restaurant), a bit of light ensures those details are visible on stream.
It also helps with focus: many cameras need some light to autofocus properly; in near darkness they might hunt for focus and go blurry often. A light prevents that. In essence, lighting is about maintaining stream quality when natural light isn’t sufficient. It extends your streaming capability into the night hours, which often have interesting content (cities light up, nightlife starts, etc.). Think of iconic IRL moments like a midnight snack in a street stall or exploring a festival after dark – those would be lost to viewers if they can’t see anything. A tiny portable light makes sure your audience stays with you from day to night.
- Professional-Grade Lighting: Compact LED panels with high brightness and adjustability. For example, an LED panel with 1000+ lumens output, adjustable color temperature (e.g., 3200K-5600K), and a built-in diffuser gives a nice soft light. These often come with rechargeable batteries that last a couple of hours per charge. A pro would also carry spare batteries if the light uses interchangeable ones, or a way to charge it via power bank. Pro lights are usually built robustly (metal bodies) and can survive drops or rain (some are weather-sealed). They provide consistent light without flicker, which is important for camera work. You pay more, but you get reliability and quality – your face will be lit evenly and naturally, making your stream look well-produced even in challenging light.
- Budget-Friendly Lighting: Pocket-sized selfie lights or DIY solutions. A very simple ring light that clips onto your phone or a generic LED video light from Amazon can do the job for casual use. Some of these run on AAA batteries or a small built-in battery. They might not last super long at full brightness (so keep them off until you really need them to conserve power), but they’re cheap to replace or carry spares. Another cheap hack: use available light sources in your environment. Carry a small flashlight – even if you don’t shine it at yourself, you can bounce it off a wall or the ground to indirectly light the scene (bouncing light can soften it). Or stand near street lamps or shop windows when you want to talk to the camera at night; essentially “borrow” light from around you. These tactics cost nothing. But for the small investment, a basic LED fill light is easier and more controllable. As a bonus, many budget lights have a USB charge port, so you can plug them into your power bank for continuous operation if needed.
Advanced Audio and Monitoring Tools (for Enhanced Production)
Beyond the basic microphone and earbud, there are some optional audio gadgets and stream management tools that can further refine your IRL stream. These are more specialized accessories for streamers who want to add complexity like multiple audio sources, high-fidelity sound recording, or easier stream control. While not necessary for everyday IRL streaming, they can be valuable for certain scenarios:
External audio recorder or mixer: If you are very particular about audio or need to handle multiple microphones, you might use an audio field recorder or mixer. For example, a small device like a Zoom H4n or Tascam recorder can take input from your lav mic and maybe a secondary mic (say you have a guest or you want to capture ambient sound separately) and then output a mixed audio feed to your stream. This can give you more control – you could adjust levels on the fly, use high-quality preamps for better sound, and even record a high-quality audio copy locally (useful if you want to edit footage later for a vlog with superior audio). A professional might do this if producing a travel documentary while also streaming – they’d have top-notch audio files saved. However, it’s extra weight and complexity to manage, so it’s truly optional unless your content demands it.
Secondary cameras / picture-in-picture: Some streamers experiment with having a secondary camera feed – for instance, a rear-facing camera and a front-facing one, or a drone camera sending footage. Managing multiple video feeds in IRL is complex, but there are devices and software that allow switching or even showing two angles at once (picture-in-picture). If you want to attempt this, you might need a small HDMI switcher or video mixer in your IRL backpack and a way to control it (like an app or physical buttons). This definitely veers into professional multi-camera production territory. It’s optional but can set your stream apart (for example, showing your face cam and a view cam simultaneously). It requires strong connectivity (more data usage) and gear, so only consider if you’re very comfortable with your core setup first.
Stream Deck or remote control: The Stream Deck is a popular USB control panel for streamers to trigger scenes, sounds, etc. In IRL, you obviously can’t have a big console in front of you, but some have used stream control apps on their phone or smartwatches to do similar things. For instance, you might have a macro to switch overlay or to mark a stream highlight. These tools are more in the software realm, but mentioning them as accessories: a smartwatch that vibrates or shows viewer stats could be seen as a monitoring accessory. It’s optional and more gadgety – not needed for basic streaming, but cool for tech enthusiasts.
Better headphones or communication devices: If you frequently collaborate with someone off-site (maybe a friend who does moderation or guides you via voice), you might invest in a more sophisticated earpiece with a push-to-talk radio style or use a walkie-talkie app. Similarly, if you want to include phone calls or interviews in your stream, a small audio interface that feeds your voice and the call audio into the stream mix could be used. These are advanced use cases – for most IRL streams, it’s just you and the environment.
Why it matters (if at all): These advanced tools matter only if they serve your content. For example, if you are streaming a live concert or street performance, capturing high-fidelity audio (perhaps in stereo) with an external recorder could greatly enhance the viewer experience of the music. If you are doing a cooking stream outdoors, having a second camera on the food might be cool for viewers. But each advanced add-on increases complexity and points of failure, so it’s a trade-off. Many top IRL streamers stick to simplicity for reliability. However, as you grow and perhaps get help (like a friend as a camera person or remote producer), you might incorporate more tech to level up your production value.
For a solo streamer, one manageable “advanced” accessory might be a better monitoring headphone or a discrete mic for yourself separate from the stream mic (for example, a tiny earpiece microphone so you can communicate off-stream to someone without that going to the stream – again, only if you have that support system). This is akin to having a private comms channel. It’s optional, but can be useful if navigating complex situations and someone is feeding you info (“The event organizer says you can come backstage, meet at door 3”).
In summary, advanced accessories are about pushing the envelope of IRL streaming towards professional broadcasting. They can set you apart, but they also demand more attention and technical skill to operate. If you’re a beginner, you can safely skip these until you’ve mastered the basics and identified a real need for them.
- Professional-Grade Advanced Tools: Multi-channel audio recorders (e.g., Zoom H6 which can take several mic inputs and provide phantom power for high-end mics) or video switchers like ATEM Mini (requires carrying a laptop or mini PC to use in the field). A pro might also use custom software (OBS with advanced plugins on a laptop in the backpack) which essentially turns the backpack into a full studio capable of overlays, multiple scenes, etc. This truly blurs the line between IRL streaming and traditional broadcasting. It’s expensive (in gear and in data for multiple feeds) and heavy, but can create unparalleled live content if executed well.
- Budget-Friendly Advanced Hacks: Using apps on your phone to simulate some of these functions. For example, the LuLuStream app or others allow limited overlay control from a phone. Or using a second cheap action camera to occasionally feed in by pointing it at your main camera’s screen (guerilla picture-in-picture!). For audio, instead of a fancy mixer, you could use a simple splitter to have two microphones (one for you, one to capture ambient sound separately) and merge them with a $5 adapter — it’s rudimentary and you can’t control mix levels separately, but it’s a low-cost way to slightly improve audio depth. Essentially, most advanced things have a scrappy workaround: not as good as the real thing, but sometimes “good enough” to experiment with. These are very optional indeed, and usually only attempted by tinkerers who want to try new things without spending too much.
Safety Accessories: Personal Safety and First Aid
While we touched on weather and gear protection earlier (which indirectly relates to safety), it’s worth explicitly considering personal safety accessories. IRL streaming can sometimes put you in unpredictable situations: you’re out in public with expensive gear, you might be walking alone at odd hours, or encountering strangers on stream. It’s important to prioritize your well-being. Carrying a few safety-focused items can provide peace of mind and practical help if something goes wrong. These don’t necessarily enhance stream quality, but they ensure the streamer (you) stays safe and the stream can continue or conclude safely.
Personal alarm or whistle: A small personal safety alarm is a device that emits a loud siren when activated. If you ever feel threatened or need to draw attention quickly (for example, someone is harassing you during a stream, or you feel unsafe in a deserted area), triggering a loud alarm can deter potential perpetrators and alert bystanders. These alarms are typically pocket-sized and can hang on your keychain. A simpler low-tech alternative is a traditional whistle – blowing a whistle loudly serves a similar function of attracting attention. These are easy to carry and could be literal lifesavers, though hopefully you’ll never need them.
Pepper spray (where legal): Some streamers choose to carry a small canister of pepper spray or mace for self-defense. This is obviously to be used only in dire self-defense situations, but knowing you have something to protect yourself might give you confidence especially if you stream in high-risk areas or late at night. Be absolutely sure to check local laws and platform rules (some streaming platforms have policies about weapons or weapon-like items on stream). Also, if you carry it, practice how to use it safely (you don’t want to accidentally discharge it toward yourself or in a crowded place unintentionally).
First aid kit: A basic first aid kit can be very handy, especially for outdoor streamers or travel streamers. It doesn’t have to be large – a small pouch with a few bandages, disinfectant wipes, some pain relievers, and maybe blister pads can handle common minor injuries. If you trip and scrape your hand or get a blister from walking all day, you can patch yourself up on the spot and continue streaming rather than searching for a pharmacy. It’s also good if you or someone around you has a small emergency; helping someone on stream can show responsibility as well. For more remote streaming (hiking/camping), you’d want to include a bit more: maybe a compression bandage, insect bite treatment, etc., but for urban use a mini kit is fine.
ID, emergency info, and cash: Always carry your ID and some cash separate from your phone (in case your digital payments fail or phone dies, cash can get you a ride or help in a pinch). Keep an emergency contact card in your wallet or bag – if something happens to you, responders can use it. While not exactly an “accessory” you buy, it’s part of a safe setup.
Flashlight and safety light: Beyond using lights for your stream, have a small flashlight for safety – if you’re walking in dark areas off-camera or need to signal, it’s useful. Some personal alarms have built-in lights too. Additionally, if you’re walking near traffic at night or biking while streaming, consider a reflective vest or clip-on LED on your backpack so drivers can see you. It might look a bit nerdy, but safety first – especially if your focus is partly on streaming, you want that extra visibility so you don’t accidentally put yourself in danger.
Anti-theft measures: To protect your gear from theft (which is a safety and financial risk), consider things like a cable lock or a GPS tracker. For example, if you ever need to leave your backpack at a table (not recommended to leave it unattended, but say you are right next to it doing something), you could use a laptop cable lock to tether it to a chair. A tiny Bluetooth or GPS tracker tag hidden in your IRL backpack can help locate it if stolen (like an Apple AirTag or Tile tracker). This won’t stop theft, but it might help recover gear. And obviously, good insurance for expensive gear can be considered a safety net (again not a physical accessory but something to think about once you have a lot invested).
Why it matters: Streaming is fun, but no content is worth risking your personal safety. Having these safety accessories ensures that you’re prepared to handle minor emergencies or deter major threats while live. It also indirectly reassures your viewers – they don’t want to see their favorite streamer in trouble. Being equipped means if something does go wrong (injury, harassment, etc.), you can respond quickly and responsibly, possibly even off-camera if needed (you can mute or point camera away and handle it). It demonstrates professionalism and maturity as a streamer to take care of yourself and those around you.
From a streaming perspective, avoiding incidents is key – an interrupted stream due to an emergency is obviously not ideal. By proactively carrying safety gear, you reduce the chance that an incident ends your stream abruptly or causes you harm. For example, a twisted ankle on a hike stream can be bandaged and maybe you can hobble back on stream rather than calling it quits immediately. Or if an aggressive individual approaches, setting off a loud alarm may scare them away without further conflict, allowing you to safely move on and continue (and possibly providing a learning moment for the audience on personal safety).
Finally, there’s peace of mind. When you feel safe and prepared, you’ll stream more confidently. Worrying less about worst-case scenarios lets you focus on entertaining and engaging with your viewers.
- Professional-Grade Safety Gear: High-quality, compact first aid kits (some are designed for backpackers and have a bit of everything in a very small case), a well-made tactical flashlight (with strobe function to signal if needed), and legal self-defense tools like pepper gel (which is less blow-back risk than spray). A pro approach is also planning – e.g., sharing your live location privately with a trusted friend or mod, so someone knows where you are if things go awry. Some IRL streamers team up or have a “stream buddy” on call. While not tangible gear, these are professional safety practices. On the gear side, even a bulletproof panel insert in a backpack is a thing some might consider if streaming in truly high-risk areas – this is extreme, but shows there are products aimed at personal security that could integrate with your gear. Most won’t need that level, but it exists.
- Budget-Friendly Safety Items: Many safety tools are inexpensive. A basic whistle costs a few dollars. Small personal alarms are often under $15. A simple DIY first aid kit can be made by putting together items from your home medicine cabinet into a ziplock bag. Reflective stickers on your backpack can improve nighttime visibility for pennies. Even carrying a spare battery charger for your phone is a safety item (to ensure you can call for help if needed). The key point: safety doesn’t have to be expensive, it’s more about awareness and having a few key items. If nothing else, at least have the whistle and some bandaids in your pocket when you stream – cheap and could really help when you need them.
Quality-of-Life Enhancements: Comfort and Convenience Tools
Last but not least, let’s talk about those miscellaneous tools and accessories that don’t directly affect the stream output but make the streamer’s life easier. These are the little things that seasoned IRL streamers come to appreciate after many hours on the road. They can reduce fatigue, keep your gear organized, and generally smooth out the streaming process. Here are some quality-of-life (QoL) accessories to consider:
Cable management and organization: With multiple devices comes a tangle of cables (charging cables, mic cables, etc.). Investing in some velcro cable ties, twist ties, or gear organizers can keep your backpack from becoming a rat’s nest. A well-organized setup means you’re less likely to have a cable snag and unplug something while you’re live. Gear organizer pouches or panels (like the Cocoon GRID-IT or similar) can hold your spare batteries, cables, SIM cards, and small tools neatly in one place. This not only saves you time finding things, but it also protects them. For example, a case for your SD cards ensures you don’t lose precious footage or a SIM case keeps your SIMs from getting damaged. It’s worth having a “home” for each item in your bag so you can do quick checks that you have everything when moving locations.
Comfort items for long streams: Streaming IRL often means walking or standing for extended periods. Simple additions like padded shoulder straps or a waist belt for your backpack can distribute weight and prevent back/shoulder pain. Many camera backpacks come with decent padding, but if your streaming backpack is more utilitarian, you can add aftermarket strap pads. Also, consider your footwear – not an “accessory” to the streaming rig, but wear comfortable shoes! It’s a huge quality-of-life factor for IRL streamers covering a lot of ground. On the streaming side, if you plan on waiting in lines (say at a theme park or event), a portable folding stool that can strap to your backpack is a neat optional item. There are ultra-light camping stools that collapse – giving you a seat anywhere. Some streamers have used them when they needed to camp out for event entry or just to take a rest during a long session.
Hydration and snacks: Again, about the streamer’s well-being – carrying a water bottle (maybe one that clips to your pack) and a small snack can keep your energy up. Viewers definitely notice if you start running out of energy or get cranky from hunger. Staying hydrated and fed is important for sustained enthusiasm and focus. A collapsible water bottle can save space when empty. While eating or drinking on stream is content in itself sometimes, even off-camera sips of water when you’re between scenes is smart.
Spare accessories and backups: Part of QoL is knowing you have backups if something fails. Always pack a spare set of batteries (or a small secondary power bank), an extra microphone or adapter if your primary one has a known weak point, and spare mounting screws or plates (those tiny bits can get lost when you detach gear – having an extra GoPro mount screw or a phone clamp in reserve can rescue your stream if one breaks). Having these spares means you won’t panic if a small piece goes missing; you can calmly swap and continue.
Multi-tool or toolkit: A small multi-tool (like a Leatherman or Swiss Army Knife) can be incredibly handy. It can cut duct tape, tighten a loose screw on your mount, open packaging, or even act as a tripod screwdriver (many plates use a coin or flathead to tighten). Make sure if you carry one that it’s legal in the areas you go (e.g., some places might not allow knives, even small ones). Alternatively, a tiny screwdriver set and a pair of scissors in your kit can handle most tech fixes. Some streamers also carry gaffer tape – a roll of mini gaffer tape can fix a broken strap, secure a cable, or attach something temporarily. Gaffer tape is preferred to duct tape for gear because it doesn’t leave sticky residue when removed.
Cleanliness and personal care: Consider a small pack of wet wipes or hand sanitizer – IRL streaming gets you into all sorts of places (and you might be handling food, handshakes, etc.). It’s nice to clean up quickly. If you stream in hot climates, a small towel or bandana can wipe sweat (also useful for wiping moisture off gear). If in sun, a cap and sunscreen protect you (sunscreen reapplication is a QoL mid-stream if you’re out for hours). If in cold, hand warmers can keep your fingers nimble to operate gear. These personal items directly impact your comfort and thus your ability to concentrate on streaming.
Why it matters: All these QoL touches add up to a smoother streaming experience where you, the streamer, are more comfortable, organized, and prepared. When you’re not fighting with tangled cables, or suffering from thirst or back pain, you can put your full attention towards engaging storytelling and interacting with chat. Viewers might not consciously see the cable ties or the shoulder pads, but they do notice if you’re constantly struggling with your gear or if you have to cut things short because you’re exhausted or disorganized. A happy streamer generally leads to a happy stream.
Also, an organized setup reduces the chance of technical problems. For example, neat cables are less likely to bend and break (so your gear lasts longer and fails less), and having spare parts means a technical hitch doesn’t turn into a stream-ending disaster. It’s all about stream reliability and consistency. Audiences appreciate streamers who are consistent and handle challenges gracefully – having these QoL tools helps you do that.
There’s also the professionalism aspect: showing up prepared and looking put-together sets a good impression. If you meet people on stream (say you interview someone or enter a business for content), having a tidy rig (versus a chaotic tangle with things falling off) makes them more comfortable with you being there. They see you as someone who knows what they’re doing, rather than a random person fumbling around.
- Professional-Grade QoL Gear: Branded organizer inserts custom-fit to your backpack, premium modular strap systems (some companies make entire harness rigs for camera operators which could be adapted for streamers, distributing weight extremely well), and high-end travel accessories like ultra-light foldable seating or advanced water purification bottles if you’re in very remote areas. A pro might also use noise-reduction earplugs when in very loud places (to protect hearing but still let them stream, especially if not needing to hear ambient sound as much). Another pro-level move: pre-configured battery holsters or quick-swap cable setups – for instance, having two batteries wired with a diode so they both feed power and you can remove one without losing power (an advanced electrical setup) – this makes battery swapping seamless. That requires some DIY electronics know-how, but some pros do it.
- Budget-Friendly QoL Items: Many QoL improvements are cheap or even free. Reuse twist ties or bread bag ties for cables. Use an old small cosmetics bag or pencil case as a tech pouch for accessories. Take a free cloth drawstring bag (those that sometimes come with gadgets or sunglasses) to store odds and ends. Instead of a multi-tool, you can carry a couple of individual small tools you already have. And simply planning and making a checklist is free: write down your essential gear and safety items and glance at it when you pack for a stream, to ensure you didn’t forget anything important (like the spare battery or the rain cover). Good habits cost nothing and improve QoL too. Over time, you’ll refine what you really need and can trim anything unnecessary, keeping your kit lean and efficient.
Conclusion
Building the ultimate IRL streaming setup is a personal journey – one that balances stream quality, portability, and your unique content needs. We’ve covered a wide array of accessories, from absolutely essential items like quality microphones, stable cameras, reliable power banks, and solid network connections, to optional enhancements like portable lighting, safety tools, and comfort gear. Not every streamer will need every item mentioned, but by understanding what each accessory offers, you can make informed choices for your own kit.
Keep in mind the diverse use cases: if you’re mostly an urban explorer, you might prioritize a discreet setup with great audio to cut through city noise, plus perhaps safety and stealth accessories for peace of mind. If you’re focusing on indoor IRL streams (like cooking or art), you may lean more on lighting and tripods and less on multi-modem setups. Event streamers will know the value of extra batteries, multiple networks, and maybe a good pair of shoes! Outdoor adventurers will pack rain covers, first aid, and stable mounts for rough terrain. Tailor your loadout to your adventures.
Also remember the two pricing paths: we’ve shown that for almost every piece of gear, there’s a high-end option and a budget alternative. You don’t need to spend a fortune to start IRL streaming; you can mix expensive gear where it matters most to you (maybe you splurge on a great mic or a bonding service) with affordable solutions elsewhere. As you grow and if streaming becomes a bigger part of your life (or even your livelihood), you can incrementally upgrade pieces of your setup.
In the end, the goal of all this gear is to enable you to share experiences with your audience in the best way possible – to bring them along virtually, with clear video, audible sound, and uninterrupted coverage. But gear is only one side; your safety, comfort, and enjoyment are equally important because a happy streamer makes for a better stream. The “optional” accessories often contribute significantly to that aspect, so don’t overlook things that keep you safe and sane during long IRL adventures.
Before you head out on your next live journey, take a moment to double-check your essentials (camera, audio, power, network, mounts) and see which optional extras might enhance the specific stream you’re doing. Over time, packing your IRL bag will become second nature. With the right accessories at your disposal, you’ll be prepared for whatever the world throws at you – rain or shine, day or night, crowded city or remote mountain trail – and you can focus on creating engaging, authentic content.
Happy streaming, and stay safe out there! With a well-equipped IRL backpack and the accessories we’ve discussed, you’re on your way to delivering high-quality streams that your viewers will love, no matter where your real-life travels take you. Enjoy the journey and the share the moments – that’s what IRL streaming is all about!